How to update ASP.NET Forms Based Authentication to use Claims Based Authentication
- Published on
- Reading time
- Authors
- Name
- Simon Waight
- Mastodon
- @simonwaight


Ah, the heady days of Visual Studio 2005 and the sparkly .NET 2.0 Framework with its newly minted Generics support. Who could forget them? For many, it seems, they are not so much recent history but an ongoing job to feed and maintain. A lot, in part, is due to the updates to .NET 3.0 and 3.5 leveraging the same CLR and BCL as the original .NET 2.0 release.
In this post I am going to do a walk through of how we can take an existing ASP.NET 2.0 WebForms application that's using Forms Based Authentication (FBA) with Membership and Role Provider support and update it to utilise a more modern Claims Based Authentication approach based on Thinktecture IdentityServer v2.
There are two main reasons why you should be interested in making this transition: (1) to remove authentication logic entirely from your application's codebase; (2) to allow you to share identity information with other applications to support Single Sign On (SSO).
Setting up Thinktecture IdendityServer v2
The first thing I'd recommend is that you setup a copy of the server we'll use for Claims Based Authentication - download the most recent version. This is primarily because we can leverage the SSL certificate that is generated as part of the setup to secure our Forms Based Application as well. The good news is that the IdentityServer application is just an ASP.NET web application itself so we can use IIS to host it for us. I set it up on https://localhost/idsrv/ and you'll see that URL used throughout this post.
The 2.0 FBA-secured Application
For the purposes of this blog I am going to use an extremely basic WebForms project that has a sub-folder (~/Secured/) that is access controlled. Note that I didn't go back and install Visual Studio 2005 - I created a new WebForm project using Visual Studio 2013 and targetted the .NET 2.0 Framework. You can download this project as a zip from Github.
The membership, role and profile database was setup simply by creating a new database on SQL Server by running this command (at the location denoted):
aspnet_regsql.exe -S {YOUR_SERVER} -E -A mrp -d {YOUR_DATABASE}
Make sure to run in the right Framework folder (C:\Windows\Microsoft.NET\Framework\v2.0.50727).
This gives us a set of tables in SQL Server (shown below) are used for storage of user authentication, authorisation and profile information.

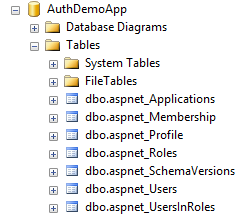
The ASP.NET SQL backend is designed to support multiple applications (multi-tenant) so the important thing to make sure we do is specify the applicationName attribute ("AuthDemoApp") when defining our member and role providers in our web.config which looks like this:
<?xml version="1.0"?>
<configuration>
  <appSettings />
  <connectionStrings>
    <!-- you'll need to change this to match your server - the one below is using the default local instance with Windows Auth. -->
    <add name="aspnetmembers" connectionString="server=.;initial catalog=AuthDemoApp;Integrated Security=SSPI"/>
  </connectionStrings>
  <system.web>
    <compilation debug="true"/>
    <authentication mode="Forms">
      <forms loginUrl="Login.aspx" defaultUrl="~/Secured/Default.aspx" requireSSL="true" />
    </authentication>
    <membership defaultProvider="SqlProvider">
      <providers>
        <add name="SqlProvider"
              type="System.Web.Security.SqlMembershipProvider"
              connectionStringName="aspnetmembers"
              applicationName="AuthDemoApp"
              minRequiredPasswordLength="5"
              minRequiredNonalphanumericCharacters="0" />
      </providers>
    </membership>
    <roleManager defaultProvider="SqlProvider"
                  enabled="true"
                  cacheRolesInCookie="true"
                  cookieName=".ASPROLES"
                  cookieTimeout="30"
                  cookiePath="/"
                  cookieRequireSSL="true"
                  cookieSlidingExpiration="true"
                  cookieProtection="All">
      <providers>
        <add name="SqlProvider"
              type="System.Web.Security.SqlRoleProvider"
              connectionStringName="aspnetmembers"
              applicationName="AuthDemoApp" />
      </providers>
    </roleManager>
  </system.web>
</configuration>
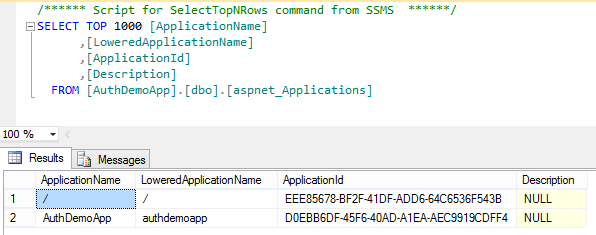
For the purpose of this demo you can load the 'AddUser.aspx' page and then use the two buttons to create a new user account and then create and assign a new role to the user as well. The result of this couple of commands is as follows in the SQL Server tables.
aspnet_Application
- ApplicationName: AuthDemoApp
- LoweredApplicationName: authdemoapp
- ApplicationId: D0EBB6DF-45F6-40AD-A1EA-AEC9919CDFF4
- Description: NULL
aspnet_Users (partial)
- ApplicationId: D0EBB6DF-45F6-40AD-A1EA-AEC9919CDFF4
- UserId: D747A14C-579C-4F6C-80BE-99414A823EDD
- UserName: bob@smith.com
- LoweredUserName: bob@smith.com
aspnet_Membership (partial)
- ApplicationId: D0EBB6DF-45F6-40AD-A1EA-AEC9919CDFF4
- UserId: D747A14C-579C-4F6C-80BE-99414A823EDD
- Password: vdmWH7boQ0lY0zBmUYHWSN7j/q4=
- Email: bob@smith.com
The important take away from the above tables is that our new Application can be uniquely identified by the GUID D0EBB6DF-45F6-40AD-A1EA-AEC9919CDFF4 which ties everything else together. Additionally we can infer that our user (bob@smith.com) can be granted access to other applications because the User D747A14C-579C-4F6C-80BE-99414A823EDD can be associated with any Application that is registered in future by way of the aspnet_Membership table.
You can log in by loading the web app and then clicking on the "Login" link which takes you to a login form. Once logged in I am redirected to a secure page that displays which role the current user is in. We are using the standard LoginName and LoginStatus ASP.NET controls in the master page.
Upgrading to Claims Based Authentication
You can download an updated project package from Github as a zip if it helps follow this.
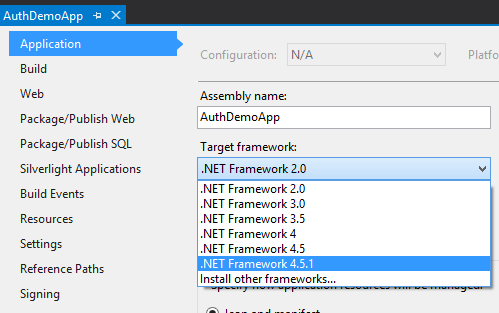
1. Update to the 4.5.1 Framework
Firstly we're going to open our existing .NET 2.0 Web Application and change the target Framework to the most recent (4.5.1) - do this by right-clicking on the web project and selecting Properties. Then change the Framework as per below. I'm happy to admit that such a big jump will probably break a bunch of your custom code but in this demo we're just focusing on updating the authentication aspects of your application.

2. Include the Claims Assemblies
As we've upgraded from .NET 2.0 Forms-based we'll need to add some new assemblies to leverage claims properly in our application.
To this end you need to add the following to your web application:
- System.IdentityModel
- System.IndentityModel.Selectors
- System.identitymodel.services
In addition to the above core assemblies that you should find on your development machine already you'll need to install the System.IdentityModel.Tokens.ValidatingIssuerNameRegistry assemblies by installing the "Microsoft Token Validation Extensions for Microsoft .NET Framework 4.5" nuget package.
Note that prior to .NET 4.5 you had to leverage Windows Identity Foundation (WIF) to integrate claims authentication with your application - with 4.5 it's now baked into the core framework though you still need to add references and install the nuget package above.
3. Update web.config
Rather than detail the changes to make to the web.config one-by-one I'm going to link to a Gist that shows you the updated config file (based on the 2.0 one above). You'll notice that the majority of the changes are adding IdentityModel configuration to ensure we trust with our Secure Token Service (STS). The one other scary item you'll note is that we set the authentication mode to "None"!!!
<?xml version="1.0"?>
<configuration>
  <configSections>
    <section name="system.identityModel" type="System.IdentityModel.Configuration.SystemIdentityModelSection, System.IdentityModel, Version=4.0.0.0, Culture=neutral, PublicKeyToken=B77A5C561934E089" />
    <section name="system.identityModel.services" type="System.IdentityModel.Services.Configuration.SystemIdentityModelServicesSection, System.IdentityModel.Services, Version=4.0.0.0, Culture=neutral, PublicKeyToken=B77A5C561934E089" />
  </configSections>
  <appSettings>
    <add key="ida:FederationMetadataLocation" value="https://localhost/idsrv/FederationMetadata/2007-06/FederationMetadata.xml" />
    <add key="ida:Realm" value="https://localhost/authdemoapp/secured/" />
    <add key="ida:AudienceUri" value="https://localhost/authdemoapp/secured/" />
  </appSettings>
  <connectionStrings>
    <!-- you'll need to change this to match your server - the one below is using the default local instance with Windows Auth. -->
    <add name="aspnetmembers" connectionString="server=.;initial catalog=AuthDemoApp;Integrated Security=SSPI"/>
  </connectionStrings>
  <system.web>
    <httpRuntime targetFramework="4.5" requestValidationMode="4.5" />
    <compilation debug="true" targetFramework="4.5.1"/>
    <authentication mode="None"/>
    <roleManager defaultProvider="SqlProvider"
                 enabled="true"
                 cacheRolesInCookie="true"
                 cookieName=".ASPROLES"
                 cookieTimeout="30"
                 cookiePath="/"
                 cookieRequireSSL="true"
                 cookieSlidingExpiration="true"
                 cookieProtection="All">
      <providers>
        <add name="SqlProvider"
             type="System.Web.Security.SqlRoleProvider"
             connectionStringName="aspnetmembers"
             applicationName="AuthDemoApp"/>
      </providers>
    </roleManager>
    <pages controlRenderingCompatibilityVersion="3.5" clientIDMode="AutoID"/>
  </system.web>
  <system.webServer>
    <modules>
      <add name="WSFederationAuthenticationModule" type="System.IdentityModel.Services.WSFederationAuthenticationModule, System.IdentityModel.Services, Version=4.0.0.0, Culture=neutral, PublicKeyToken=b77a5c561934e089" preCondition="managedHandler" />
      <add name="SessionAuthenticationModule" type="System.IdentityModel.Services.SessionAuthenticationModule, System.IdentityModel.Services, Version=4.0.0.0, Culture=neutral, PublicKeyToken=b77a5c561934e089" preCondition="managedHandler" />
    </modules>
  </system.webServer>
  <system.identityModel>
    <identityConfiguration>
      <audienceUris>
        <add value="https://localhost/authdemoapp/secured/" />
      </audienceUris>
      <securityTokenHandlers>
        <add type="System.IdentityModel.Services.Tokens.MachineKeySessionSecurityTokenHandler, System.IdentityModel.Services, Version=4.0.0.0, Culture=neutral, PublicKeyToken=b77a5c561934e089" />
        <remove type="System.IdentityModel.Tokens.SessionSecurityTokenHandler, System.IdentityModel, Version=4.0.0.0, Culture=neutral, PublicKeyToken=b77a5c561934e089" />
      </securityTokenHandlers>
      <certificateValidation certificateValidationMode="None" />
      <issuerNameRegistry type="System.IdentityModel.Tokens.ValidatingIssuerNameRegistry, System.IdentityModel.Tokens.ValidatingIssuerNameRegistry">
        <authority name="http://identityserver.v2.thinktecture.com/trust/claimsdemo">
          <keys>
            <add thumbprint="42458679ECD5F89F51FD126BE3F2F4408464C936" />
          </keys>
          <validIssuers>
            <add name="http://identityserver.v2.thinktecture.com/trust/claimsdemo" />
          </validIssuers>
        </authority>
      </issuerNameRegistry>
    </identityConfiguration>
  </system.identityModel>
  <system.identityModel.services>
    <federationConfiguration>
      <cookieHandler requireSsl="true" />
      <wsFederation passiveRedirectEnabled="true" issuer="https://localhost/idsrv/issue/wsfed" realm="https://localhost/authdemoapp/secured/" requireHttps="true" />
    </federationConfiguration>
  </system.identityModel.services>
</configuration>
At this stage if you fire up the web application (you'll need to do it over HTTPS) you'll find if you try and browse the ~/Secured folder that you'll be directed to the ThinkTecture IdentityServer login page.
Important note: If you don't set httpRuntime to support .NET 4.5 (line 17 of the Gist above) you'll get a YSOD on login with a request validation failure due to the way WS-Fed passes the necessary authentication information to your application.
4. Setup ThinkTecture IdentityServer Databases
Whew! If you're still with me you're going strong! Now that we have web application ready for claims lets get our STS in working order as well (don't worry if you've previously set it up - we can get it working as we need pretty easily).
As a first step make a backup of your existing ASP.NET SQL database for safety :).
The Thinktecture IdentityServer will utilise an existing Membership database if it can find one and will automatically create its configuration database schema if one isn't found on the target SQL Server. Let's create an empty database called 'IdentityServerConfiguration' into which the IdentityServer can create it's own schema.
Open up the location on disk that you installed the IdentityServer in and then open the ~/Configuration/connectionStrings.config file and:
- Point both databases at your SQL Server instance.
- Set the 'ProviderDB' connection string to utilise the same ASP.NET memberhsip and role database as your existing web application.
- Set the 'IdentityServerConfiguration' connection string to point at the empty database we just created.
You file should look like this:
<connectionStrings>
  <!-- configuration data like endpoints, protocol config, relying parties etc... -->
  <add name="IdentityServerConfiguration"
       connectionString="server=.;initial catalog=IdentityServerConfiguration;Integrated Security=SSPI"
       providerName="System.Data.SqlClient" />
  <!-- user database -->
  <add name="ProviderDB"
       connectionString="server=.;initial catalog=AuthDemoApp;Integrated Security=SSPI"
       providerName="System.Data.SqlClient" />
</connectionStrings>
Now when you visit the IdentityServer at https://localhost/idsrv/ you'll be presented with the initial configuration screen. Go ahead and change the values as you wish - the important one in our case is the value for "Issuer URI" which is used by the relying parties we set to use this STS (hint: our web application already has this value in the web.config - http://identityserver.v2.thinktecture.com/trust/claimsdemo).
Also make sure you setup a default admin account for your STS! Your page will look like this:

5. Make Your Users Claims Users
Now that we've done all of the above the next bit is the trick to all of this 🙂.
If you look at the aspnet_Applications table in your database you will find a new one listed that has an ApplicationName of "/" - this is your STS and is the key to this step.

You have two choices at this point - simply run some SQL to update all existing user and membership entries to map them to the STS ApplicationId or create duplicate entries within the necessary tables to ensure that old user records remain unchanged.
Once you've done this you should be able to see that the https://localhost/idsrv/Admin/User page displays all the users that used to be for your forms-based application.
The final piece of the user puzzle is to add all your existing users to the "IdentityServerUsers" role. This can be achieved by writing SQL to simply add entries to the aspnet_UsersInRole table that maps the appropriate RoleId to all the UserId's you imported.
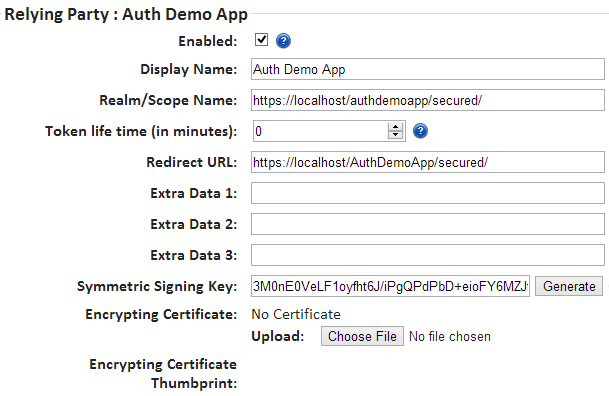
6. Define your Web Application as a Relying Party
Open up the https://localhost/idsrv/Admin/RP page on the IdentityServer as the admin user and define a new relying party (your web app) - details are shown below.

Are we there yet?
Well, yes, we are. Almost.
If you're leveraging the in-built role provider in your web application you will find that it is not working. The easiest way to fix it is to shift the roles to your STS and then everything will start working as expected. As your role database is already available to the STS simply go through the same exercise of updating each Role in aspnet_Roles to be assigned to the IdentityServer ApplicationId.
... and, finally, there's a little sign-in / sign-out magic you'll need - if you take a peak at the Main.Master page you'll see the changes to make the button work (you could easily wrap in your own control to avoid needing to put code into the master page 🙂).
So, there we are, I hope you find this useful and that you start your journey to moving your web applications to be claims aware.
HTH.