Getting Web Deploy Working For Non-Admin Logins
- Published on
- Reading time
- Authors
- Name
- Simon Waight
- Mastodon
- @simonwaight


There’s a lot of good information around online about how to get Web Deploy (a.k.a. msdeploy) working. What most of the information tends not to cover is how to get it functioning for non-admin users.
In this post I’m going to cover the steps to go through to get a non-Admin windows user working for deployments.
The Foundation
First of all, let’s get the basics out of the way. This is the environment these instructions are applicable to:
- Windows Server 2008 R2 (with SP1).
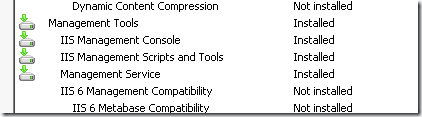
- Web Role (IIS) Installed – make sure you have installed the Management Service (see below).
- Windows Firewall on but with an Inbound allow rule for TCP traffic on port 8172.
- You have downloaded Web Deploy.

Now we have the main bits ready to go we need to setup Web Deploy.
Install and Configure Web Deploy
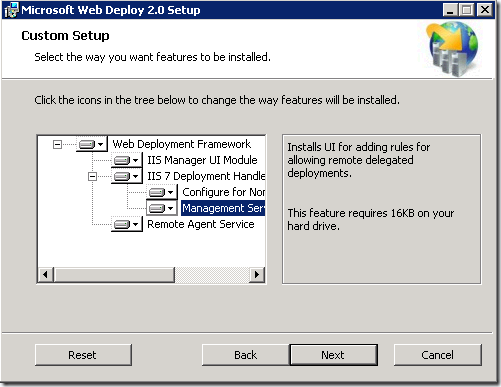
When you install Web Deploy you need to make sure all components are available. Either select ‘Complete’ or ‘Custom’ when prompted for what to install. You should find that the components to install looks like the following.

Once you have finished the installation you can verify the state of your configuration by reviewing your server and you should find:
- A new local user called WdeployAdmin.
- Two new services – Web Deployment Agent Service and the Web Management Service.


Add Windows Login
We’re going to be using a non-Admin user for our deployments so lets go ahead and add a new Standard Windows login (i.e. one that is not an Administrator).
Note: Username and password should be chosen with care – in some deployment scenarios your password (particularly) may cause issues if it has characters that cannot be included in XML without being escaped. A simple rule of thumb is to avoid &, < and >.
Tip: If you have authentication issues test using a simple password that has no special characters.
Configure Management Service
We need configure the management service to allow remote connections and (in this instance) to only allow Windows credentials (the default).
Open up the IIS Manager on your server and ensure you have Features View on in the right pane.
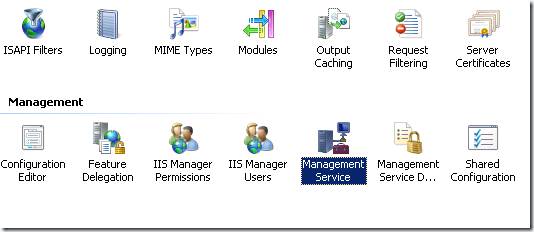
Look for the Management Group (usually at the bottom) and then within that group select Management Service (see below).

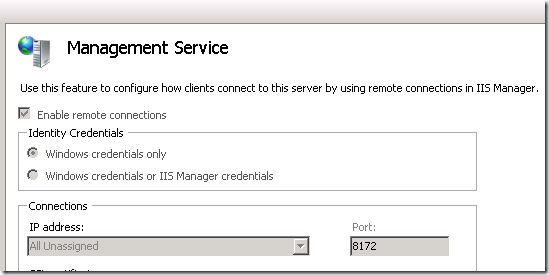
When this view opens you will most likely find the form is disabled – this is because the service is running – you can’t change the configuration. If you look at the right pane you will see an option to Stop the service.
Make sure to check the ‘Enable remote connections’ option and to leave the ‘Windows credentials only’ selected (as below). Now restart the service.

Grant Windows Login IIS Manager Permissions
You can now grant the non-Admin user you created earlier the rights to manage sites on your IIS machine.
In the left pane of the IIS Manager select the site you wish to add your Windows login as a manager for (you will need to repeat for each site).
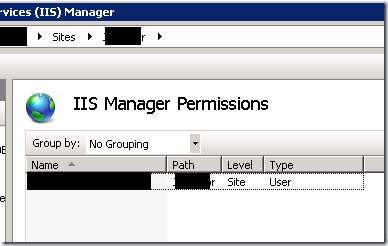
In the right pane you should see a Management group with two options (Configuration Editor and IIS Manager Permissions). Open the IIS Manager Permissions view.
In the new view that opens on the right hand pane near the top you should see ‘Allow User…’ – click on it and a popup will appear.
From the popup you can select the Windows user you wish to add – click on the Select button and then search for the user you create previously. Finally click OK on the two dialogs so you return to the initial screen where you will see a new entry for your user (sample below).

The Missing Link
I can almost guarantee you at this point that if you run the deployment it will fail. This is something I spent a fair amount of time trying to troubleshoot and so I have this advice for you:
The non-Admin Windows login you granted IIS Manager Permissions to must be able to read / write to the root folder location that the IIS site is deployed to.
Using this approach I’ve been able to get non-Admin users publishing successfully so the approach should work for you too.
May 2012 - Updated!
One important addition to add to all of the above.
When you setup Web Deploy it will create a two local users on the host that have priveleges to setup IIS sites and modify configuration files. The logins are WDeployAdmin and WDeployConfigWriter.
If you find that after a period of time Web Deploy starts giving errors and not deploying it is most likely due to the passwords for these users expiring and Windows setting the "user must change password on next logon" flag (assuming you left the default password policy in place on your Windows server). Either set the password not to expire or update it and clear the next logon flag.