How to Build and Debug an Alexa Skill with Python and Azure Functions
- Published on
- Reading time
- Authors

- Name
- Simon Waight
- Mastodon
- @simonwaight
Voice assistants have become all the rage, and they provide a great way to access and consume information. A fairly common scenario, and one that most assistants ship with, is reading the latest news headlines.
This got me thinking about how I could take the foundation of my last post on generating a PowerPoint presentation from the latest Azure Updates RSS feed and use it to create a way for people to hear these updates via a voice assistant.
The assistants most people would be familiar are Amazon Alexa, Google Assistant and Apple's Siri. For this post I am going to pick Amazon's Alexa assistant and build a Skill that allows Alexa users to hear the latest Azure news.
Most code samples in the Alexa documentation simply use AWS Lambda serverless backends, but for my post I am going to replace Lambda with it's equivalent in Azure - Azure Functions. We'll be using Python to build our Skill.
Note: I opted to go with a bare-bones implementation on Azure, but if you're looking to build a more complex user experience it's worth looking at the Azure Bot Service and SDK and then connecting the resulting Bot to Alexa. The benefit of this route is you can build your Bot logic and flow once and then publish to multiple channels.
TL;DR... show me the code!
Maybe you're looking for a complete non-Lambda Alexa Skill sample in Python and struggling to find anything in the official docs or repositories. If all you want is the code from this blog, you can find it on GitHub.
Want to know how to get it all working as well? Read on!
Pre-requisites
If you'd like to build your own Alexa Skill similar to the one in this post, this is what you'll need:
- Python 3 (I used 3.8) including pip
- Visual Studio Code with these extensions:
- An Amazon Alexa Developer Account.
Getting Started
Once you have all the pre-requisites in place you can start by creating a new Python-based Azure Functions project in Visual Studio Code using the official Microsoft Quickstart as a guide. You need a HTTP trigger (which the Quickstart uses) and should set the authentication for the method to "Anonymous".
If you run the Azure Function locally you will see the URL published in a format similar to:
http://localhost:7071/api/YourFunctionName
At this point we are ready to add the code to support our Alexa Skill.
Add the Alexa Python SDK to our Azure Function
We need to first add the SDK that Amazon publishes for developers wishing to build Alexa backends using Python.
If you look in your Azure Functions project you will see a 'requirements.txt' file. Open that file in Visual Studio Code and add the Alexa SDK items we need, along with a couple of other libraries we will need to complete our implementation. Once finished your file should look like the snippet below.
azure-functions
beautifulsoup4
requests
ask-sdk-core
ask-sdk-webservice-support
Once you have made these change, and so you have all the libraries locally for development purposes, you can run this command in the terminal in Visual Studio Code:
pip install -f requirements.txt
Note: I found that the Alexa webservices library has a reliance on a version of the cryptography library that appears to clash with versions required for some Azure SDK Python libraries such as Azure Storage. In this sample it's not an issue, but one to keep an eye out for. Pip will complain when trying to install the package so you'll know if you hit it!
Now we have the necessary components locally for our development environment we need to configure our Alexa Skill via the Alexa Developer Console. I had a quick look at the Alexa CLI (ask) but it once again appears only to tie into Lambda-based environments so it's a no-go for us here and we'll need to use the Console.
Configure our Alexa Skill
When a user invokes your Skill, the request is directed to an Amazon-managed Alexa API which performs the voice-to-text action and then forwards the text to your Skill backend implementation.
In order for Alexa to know about your Skill and its implementation, you have to configure it via the Alexa Developer Console.
Let's go ahead and do that now.
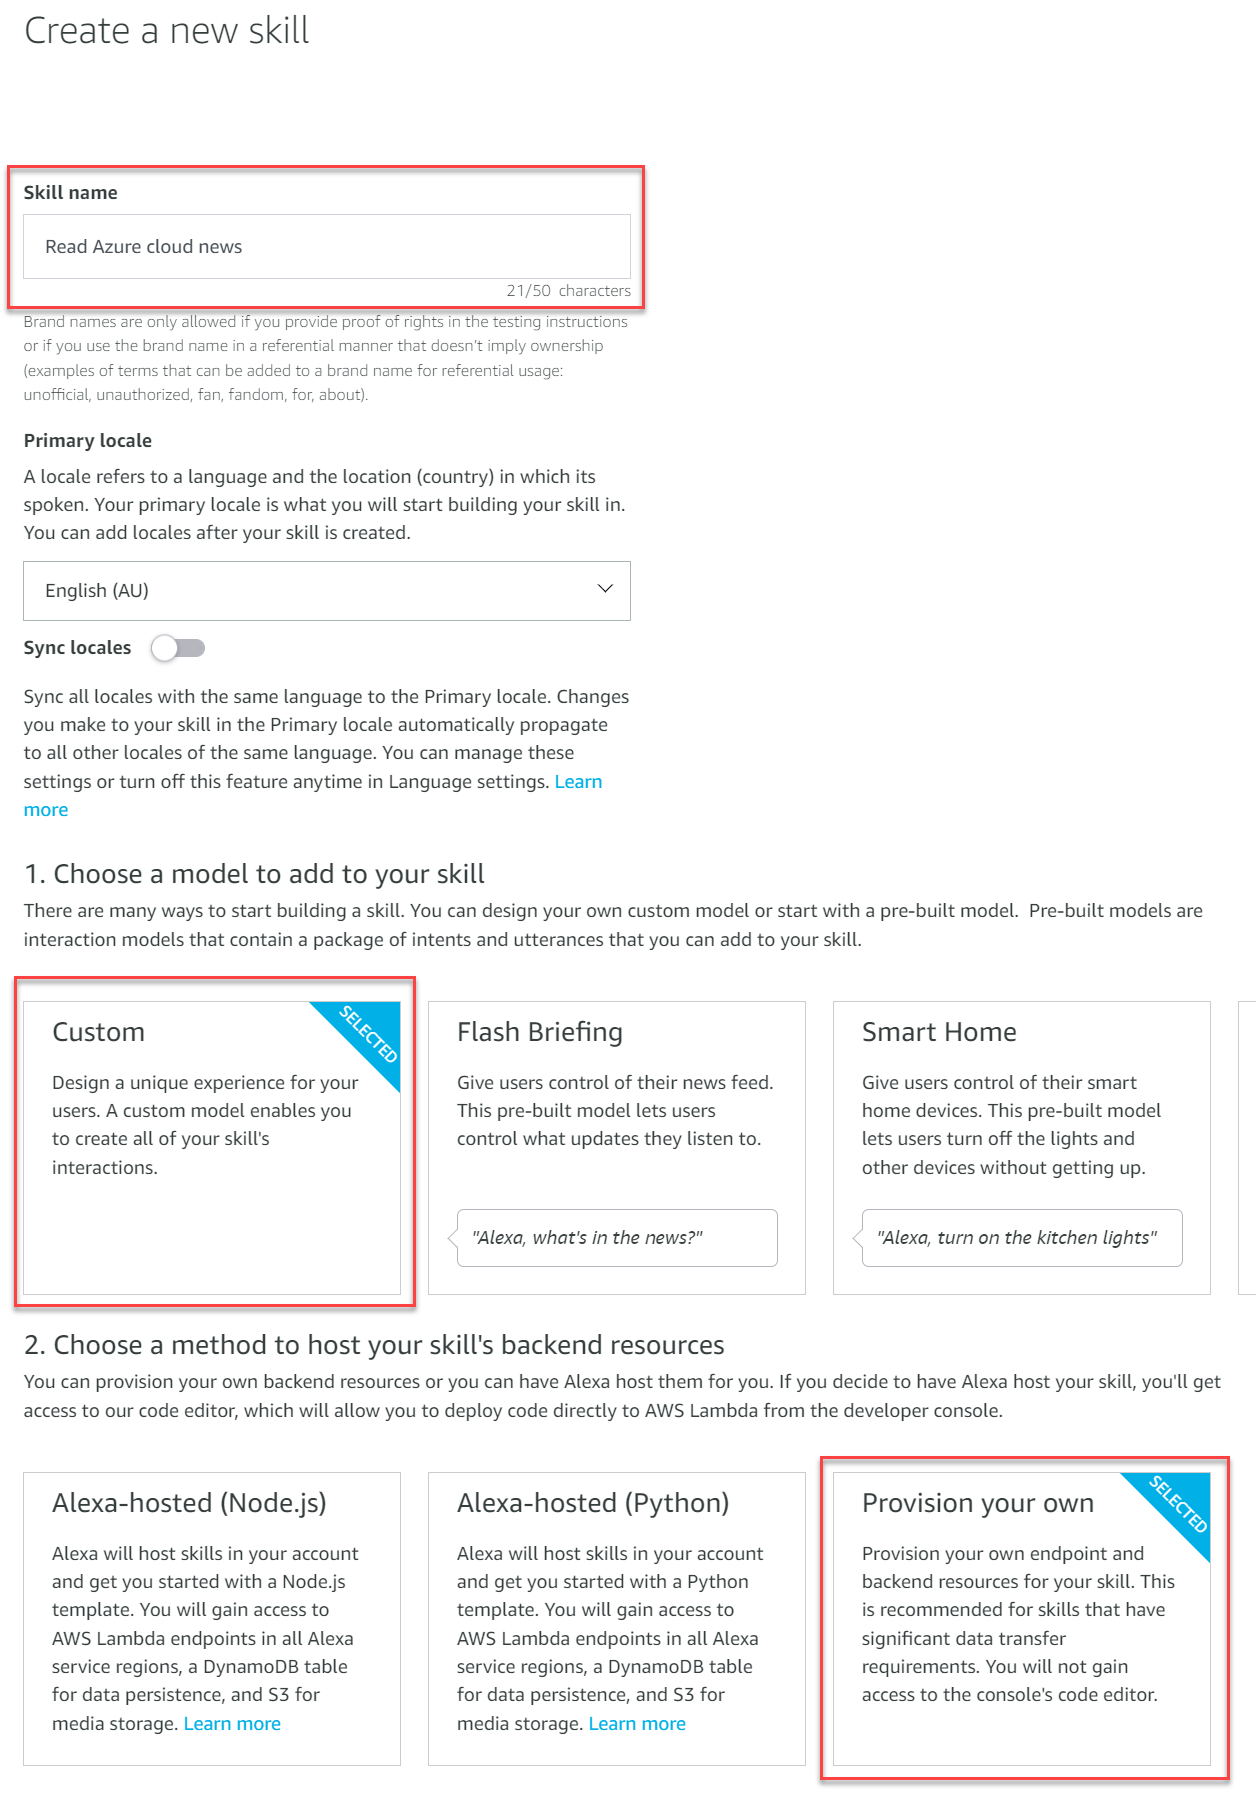
First we need need to define the Skill, the interaction model to use, and how the Skill will be implemented. I called my Skill "Read Azure cloud news" (you'll note the Console hint on brand name use - if I wanted to publish this Skill I would need to show I have the right to use the Azure brand, but for this demo it works fine). I will build a Custom interaction model and use my own hosting (the other two options will give you Lambda-hosted solutions).
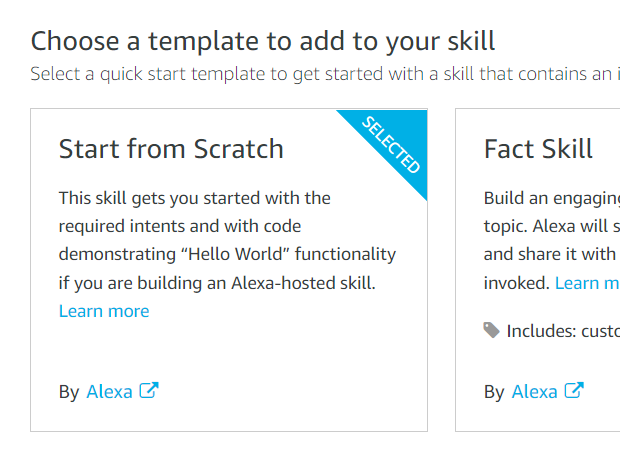
On the next screen select "Start from scratch" for the template to use.
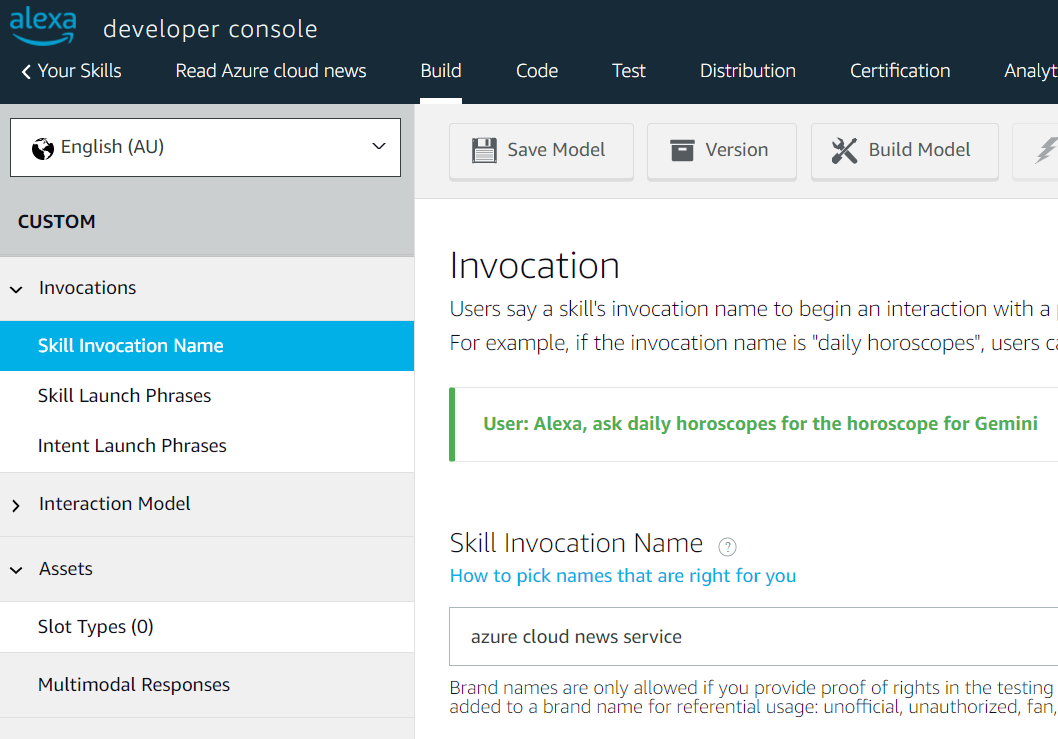
Next let's define the Skill Invocation Name.
This is what users will say after they wake up Alexa, so for my Skill I want a user interaction to be "Alexa, ask the Azure cloud news service for the latest news".
In the Developer Console expand the "Invocations" section and select "Skill Invocation Name" and enter your text. Click "Save Model" at the top.
We have one more step to go before we can head back to Visual Studio Code and cut some code!
We need to create an Intent which is what we use to drive actual user interaction.
To help understand what an Intent is, consider the user interaction of "Alexa, ask the Azure cloud news service for the latest news". In this interaction our Intent is derived from the "latest news" statement.
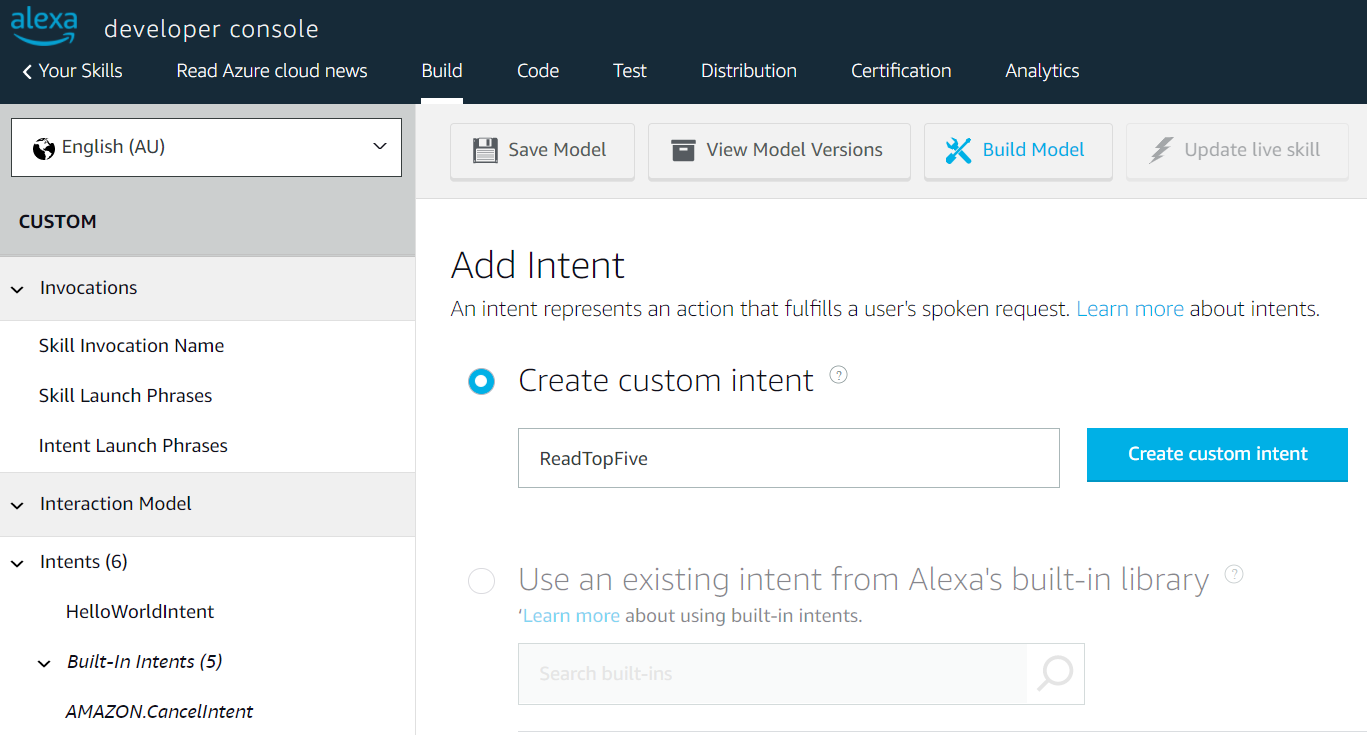
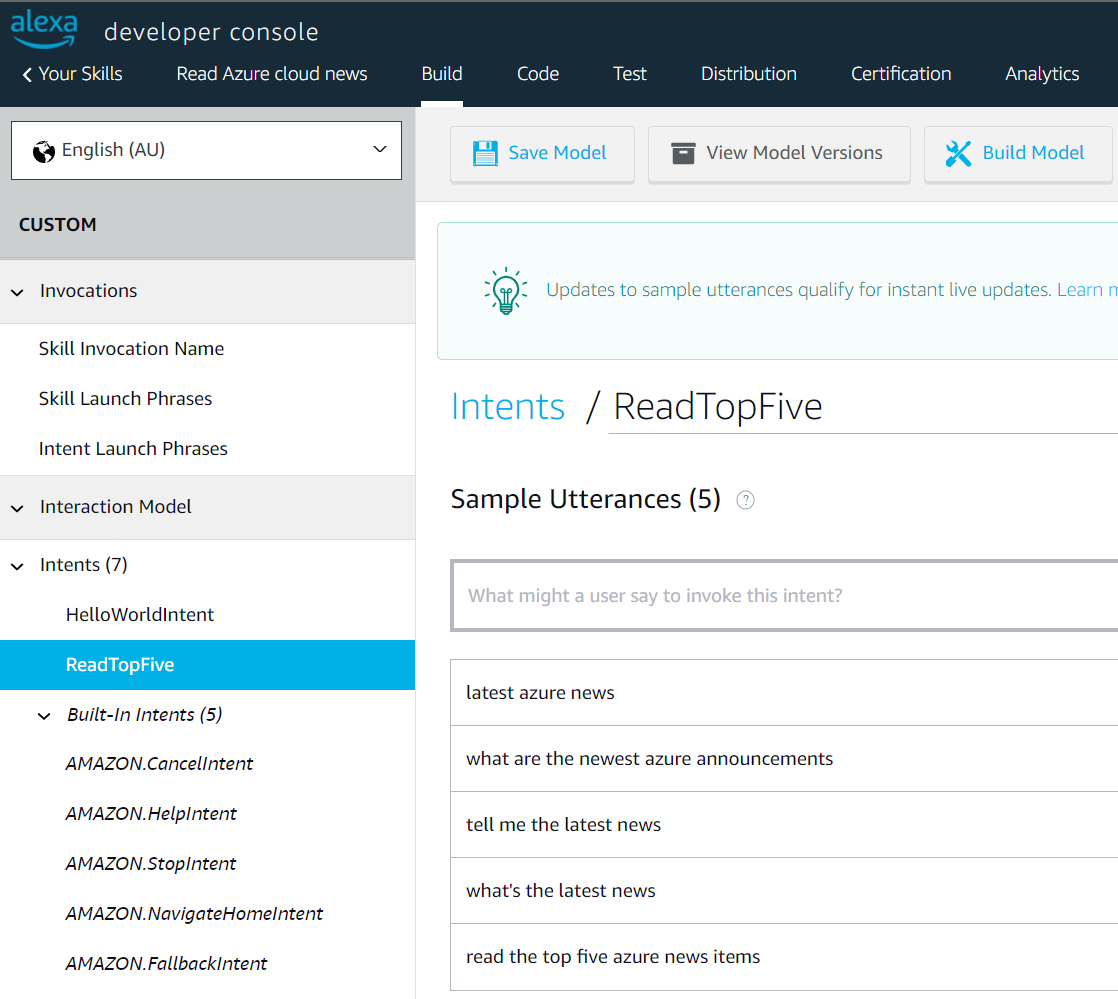
In the Developer Console expand the "Intents" section and click the "+ Add Intent" button. We are going to create an Intent for reading the latest top five news items. Give it an Intent Name and click "Create custom intent".
The Intent Name is important as it is what we will use to match incoming requests in our code.
We then need to provide some sample Utterances (sentences or statements) that a user might use to signal that this is their action (or intent) when using the Skill.
If the Alexa model matches a voice or text command to an Utterance then it will select the Intent and send it through to your backend implementation. Note these matches aren't simply a 1:1 match - these Utterances help train a voice-to-text recognition model which matches more than just the samples you provide!
Alright, now we're ready to implement the first parts of our Alexa Skill backend in our Azure Function.
Handling Alexa Intents in your Azure Function
There are a few ways you can implement an Alexa Skill in Python, but for this post I am using Python classes where each class will be used to handle a single Intent.
The below code snippet shows how can handle the Intent we just defined. You can see that it simply does a match on the name of the Intent and then passes any match to the handle function where our actual logic is stored.
For our Skill we download the Azure Updates RSS feed and return to the top five headlines to Alexa for it to read.
You can embed Speech Synthesis Markup Language (SSML) snippets in the text to control how Alexa reads the text.
class ReadTopFiveItems(AbstractRequestHandler):
    """Handler for ReadTopFive Intent."""
    def can_handle(self, handler_input):
        return ask_utils.is_intent_name("ReadTopFive")(handler_input)

    def handle(self, handler_input):
        logging.info("Called Skill Handler for ReadTopFive Intent.")
        speak_output = "There are no new Azure items currently available for today."
        ending =  datetime.now()
        starting = ending + timedelta(days=-7)
        updatelist = get_updates_rss(startDate=starting,endDate=ending)

        if len(updatelist) > 0:
            speak_output = "Here are the most recent 5 Azure news items."
            speak_output+= generate_list_respose(updatelist)
            speak_output += " That's the most recent 5 announcements on Azure!"
        return (
            handler_input.response_builder
                .speak(speak_output)
                .ask(speak_output)
                .response
        )
We also need a couple of other default handlers as well. One for the launch of the Skill which introduces the Skill and tells the user what they can do, and an exception handler which can be used to handle any unexpected errors in your Skill. The code snippets for these are shown below. The LaunchRequest intend doesn't require you to configure anything in the Developer Console - it's there by default.
class LaunchRequestHandler(AbstractRequestHandler):
    """Handler for LaunchRequest."""
    def can_handle(self, handler_input):
        return ask_utils.is_request_type("LaunchRequest")(handler_input)

    def handle(self, handler_input):
        logging.info("Called Skill Handler for LaunchRequest Intent.")
        speak_output = "Hi there! I'm the Azure news service and I can read you the latest Azure cloud news.\r\nYou can ask for the latest news by saying <break time='0.5s'/>'latest news', or ask for the top news items from a specific date by saying <break time='0.5s'/>'top news from'<break time='0.5s'/> and then the date, making sure to include the year."
        return (
            handler_input.response_builder
                .speak(speak_output)
                .ask(speak_output)
                .response
        )

class CatchAllExceptionHandler(AbstractExceptionHandler):
    """Generic error handling to capture any syntax or routing errors. If you receive an error
    stating the request handler chain is not found, you have not implemented a handler for
    the intent being invoked or included it in the skill builder below.
    """
    def can_handle(self, handler_input, exception):
        return True

    def handle(self, handler_input, exception):
        logging.error(exception, exc_info=True)
        speak_output = "Sorry, I had trouble doing what you asked. Please try again."
        return(
            handler_input.response_builder
                .speak(speak_output)
                .ask(speak_output)
                .response
        )
Finally, we need to create a SkillBuilder in our main Azure Function to ensure incoming requests are validated, passed to the right handler, and an appropriate response sent back to the caller.
You can grab your Skill ID from the Alexa Developer Console. In the final implementation I am reading the Skill ID from the application settings so it's easy for you to update to your own.
def main(req: func.HttpRequest) -> func.HttpResponse:
    skill_builder = SkillBuilder()
    skill_builder.skill_id = os.environ["AlexaSkillID"]
    skill_builder.add_request_handler(LaunchRequestHandler())
    skill_builder.add_request_handler(ReadTopFiveItems())
    skill_builder.add_request_handler(ReadItemsFromDate())
    skill_builder.add_request_handler(HelpIntentHandler())
    skill_builder.add_request_handler(CancelOrStopIntentHandler())
    skill_builder.add_request_handler(SessionEndedRequestHandler())
    skill_builder.add_exception_handler(CatchAllExceptionHandler())
    webservice_handler = WebserviceSkillHandler(skill=skill_builder.create())
    response = webservice_handler.verify_request_and_dispatch(req.headers, req.get_body().decode("utf-8"))
    return func.HttpResponse(json.dumps(response),mimetype="application/json")
You can grab the completed Python Function code from GitHub and add it to your project. This ensures you have the right imports and the RSS function in place to run the solution.
Testing your Skill
Our code is now complete enough that it will manage simple interactions. Before we can test using the Alexa Developer Console we need to do a few things:
- Publish our local Azure Function via an ngrok proxy (remember we installed the extension in VS Code). Use Port 7071 which is the default the Azure Functions Core Tools will use. The free tier for ngrok should suffice.
- Copy the ngrok proxy address to our clipboard.
- Go into the Alexa Developer Console for our Skill and select the Endpoint section.
- Switch the Endpoint from being a Lambda ARN to HTTPS and then put in the ngrok proxy address and our Azure Function relative path (/api/YourFunctionName).
- Rebuild the Alexa Model.
The video below shows you these steps. Note the video has no audio.
Once we' done the above steps we can now switch over to the Test tab in our Skill in the Alexa Developer Console and test out our Skill. Here's a sample of how it works.
Note that if you stay in a breakpoint in Visual Studio Code for too long the Alexa service will automatically timeout and give the user a default message around not being able to complete the request.
Moving to Production
If you go and look at the GitHub repository you will see there is a GitHub Actions workflow which was created by the Azure Functions Deployment Centre in Azure after this repository was selected as a source. Updates pushed to the repository are automatically built and deployed.
You do need deploy the two Application Settings into Azure - one for the RSS endpoint and one for your Alexa Skill ID. For our demo you can manually insert them, but it is possible to automate their deployment as well in the Actions workflow if we really wished.
At this point we can update our Skill Endpoint in the Alexa Developer Console to point at our deployed Azure Function URL, rebuild the model and we are then calling our Production Skill!
If you wanted to launch the serivce you would still need to go through distribution checks with Amazon. In my example they'd be unlikely to approve my use of the Microsoft brand "Azure" so I'd have to change that, but apart from that our Skill is pretty much feature complete!
Bonus Points - Intent with a Slot
Right now we have a fully functional, if basic, Alexa Skill powered by Azure Functions. If you want to see how we can extend the usefulness of the service, read on!
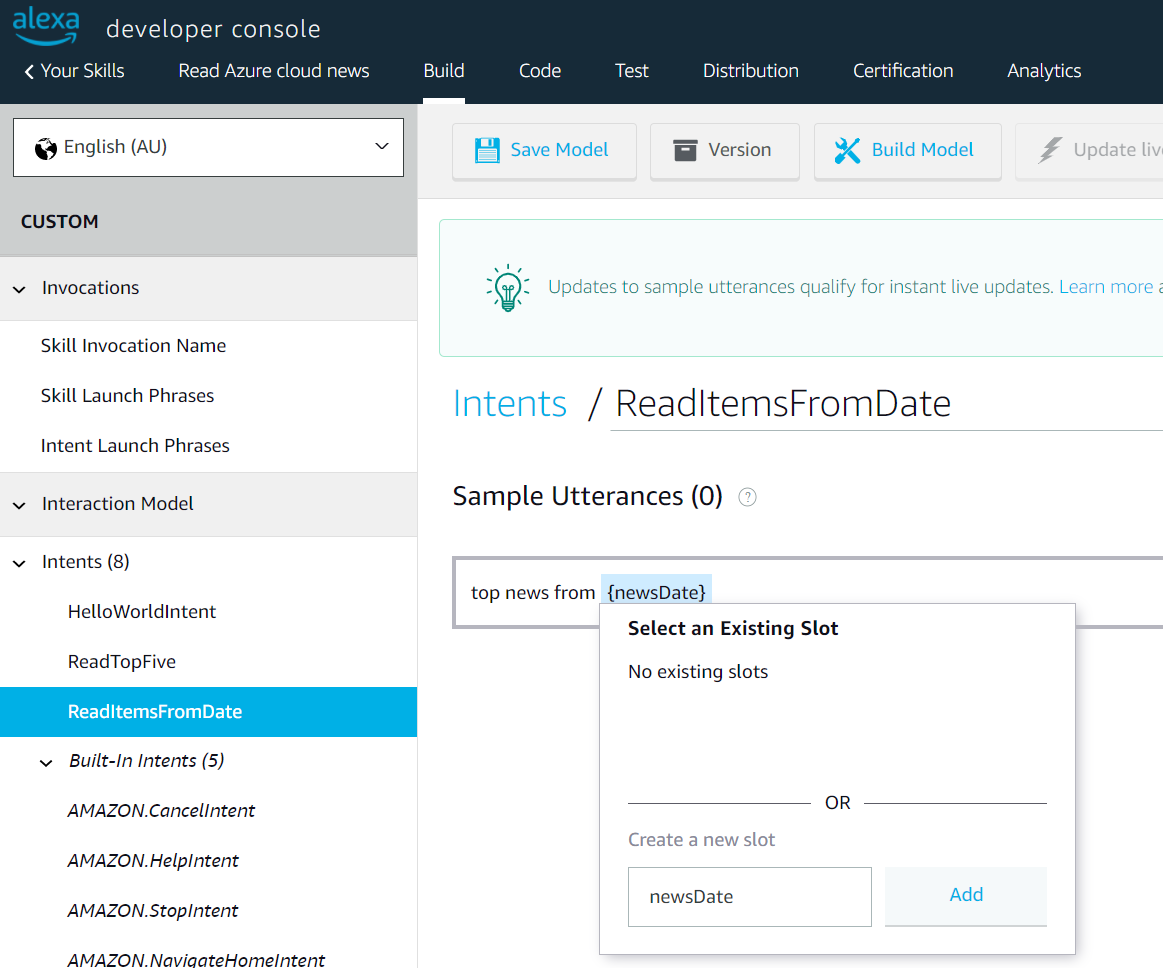
Let's add support for reading news from a particular date and see how we can build that out. For this we will need to define another Intent for our Skill and define a "Slot" within it for our date.
In the Alexa Console add a new Intent called "ReadItemsFromDate".
This time when we provide sample Utterances we want to define a placeholder (known as a Slot in the Alexa world) that will be replaced by a user saying a date.
You can add a Slot to an Intent by adding a placeholder in Utterances enclosed in {curly braces}, as shown in the screenshot below. Once you have done this you should then define the data type for the slot.
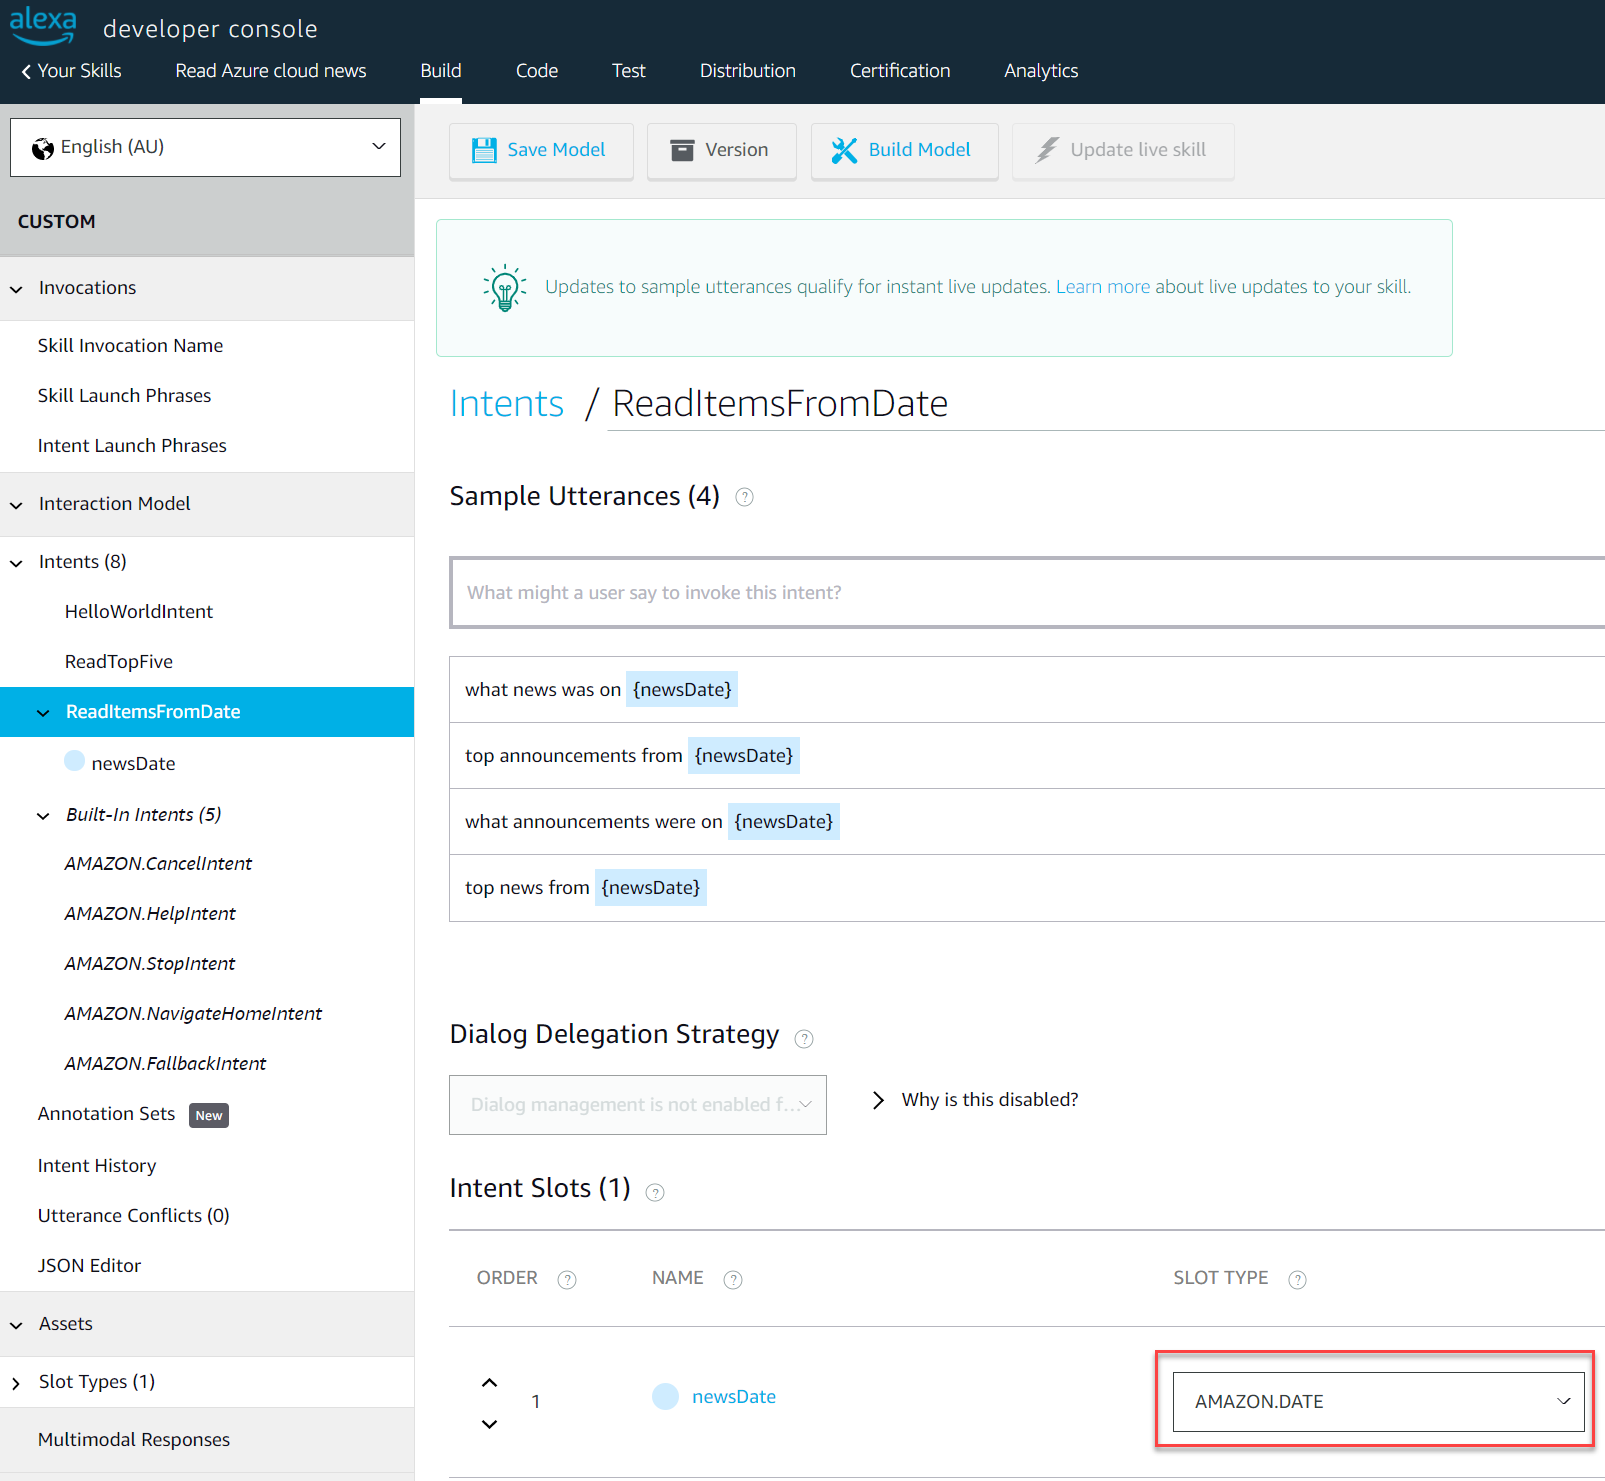
In our case we will use the pre-defined "AMAZON.DATE" type. As a tip, make sure to understand how these Slots can be interpreted. For example, any date that doesn't specify a year is always assumed to be a future date... which isn't really helpful if we are asking for past news items!!!
You can continue to use the Slot in other Utterances so that the model can start to figure out how users might ask for news from a particular date. You can see in the below screenshot where we have set the Slot data type as required.
Now we have this configured we need to write a handler for it in our Azure Function. The code for this is shown below.
https://gist.github.com/sjwaight/6621e89df0b2f9a557cefe37e41fee07
The great thing with the Slot type we are using is a Skill user can say something like "top news items from last Tuesday" and Alexa will figure it out and simply send you a date in an ISO-8601 format (YYYY-MM-DD). You can even pass dates back to Alexa in ISO-8601 format and Alexa will speak them out completely to the user.
Wrapping Up
Whew! There's a lot in this post, but I do so hope you've found it useful and it saves you some time - even just having a full non-Lambda sample to help understand how webservice-hosted Alexa Skills hang together.
As a final thought, even though I've used Azure Functions as my hosting option, I can easily Containerise this solution and then deploy it anywhere I can run a Container, which means I'm able to deliver a highly available Alexa service that is cloud agnostic without any code or runtime hosting changes!
Until next time, happy days! 😎