Azure SQL Database - Dynamic Data Masking Walkthrough
- Published on
- Reading time
- Authors

- Name
- Simon Waight
- Mastodon
- @simonwaight
Microsoft recently announced the public preview of the Dynamic Data Masking (DDM) feature for Azure SQL Database that holds a lot of potential for on-the-fly data obfuscation that traditionally would have required either custom business logic or third party systems.
In this post I am going to take the opportunity to walk through how we can set this up for an existing database. For the purpose of this post I am going to utilise the AdventureWorks sample database for Azure SQL Database which you can download from Codeplex.
Our Azure SQL Database Server
Firstly we need to understand our Azure SQL Database Server instance configuration. At time of writing any existing Azure SQL Database Server or one created without specifying a Version flag will use the "2.0" Azure SQL Database engine which does not support DDM.
If this is your scenario the you will need to upgrade your server to v12 using the Azure Management Portal - make sure you follow the planning guidance provided by Microsoft. Note that an upgrade has minimal impact on running databases - there will be brief interruption to service at the very end of the upgrade, but for the rest of the process your database will remain online.
I'm going to setup my server using the following PowerShell, but if you want to specify a server name them you will need to use the preview portal (https://portal.azure.com/). Note the Version parameter I'm providing to specify the new engine release.
# Should return 0.8.14
(Get-Module Azure).Version

New-AzureSqlDatabaseServer -Location "West US" \
                           -AdministratorLogin bobsyouradmin \
                           -AdministratorLoginPassword N0tRe4l? \
                           -Version 12.0
Notes:
- At the time of writing there is a known issue with this Cmdlet due to the time it takes to complete exceeding the maximum PowerShell timeout. The server will still be created but you will receive an error.
- Make sure you open up the firewall on the server to allow your client machine to connect. You can do this via the Azure portal or PowerShell.
After this has run I'll have an Azure SQL Database instance with the v12 engine ready for use. My next step is to deploy the Adventureworks database schema and data. We can do this leveraging the downloaded package (from Codeplex) and then running the following command at an Admin-elevated command prompt.
CreateAdventureWorksForSQLAzure.cmd {servername}.database.windows.net {user}@{servername} {password}
Once this command completes we will have a database setup that we can now query. I'm going to simply use SQL Server Management Studio (SSMS) for this. You will need a version recent enough to support Azure SQL Database (SSMS for SQL Server 2012 and 2014 will do).
This is the test query we'll use to show how data masking works. I'm going to run the initial query as our admin user ('bobsyouradmin').
SELECT TOP 10 BusinessEntityID, FirstName, MiddleName, LastName
FROM Person.Person
Which results in the following.
| BusinessEntityID | FirstName | MiddleName | LastName |
|---|---|---|---|
| 285 | Syed | E | Abbas |
| 293 | Catherine | R. | Abel |
| 295 | Kim | NULL | Abercrombie |
| 2170 | Kim | NULL | Abercrombie |
| 38 | Kim | B | Abercrombie |
| 211 | Hazem | E | Abolrous |
| 2357 | Sam | NULL | Abolrous |
| 297 | Humberto | NULL | Acevedo |
| 291 | Gustavo | NULL | Achong |
| 299 | Pilar | NULL | Ackerman |
Getting the Mask On
Now that we've gotten everything setup, let's go and mask the LastName field. Firstly we need to switch on Dynamic Data Masking for our Azure SQL Database instance via the Azure Portal.
Navigate to the Azure SQL Database instance and then select the Auditing & Security tab on the very right.
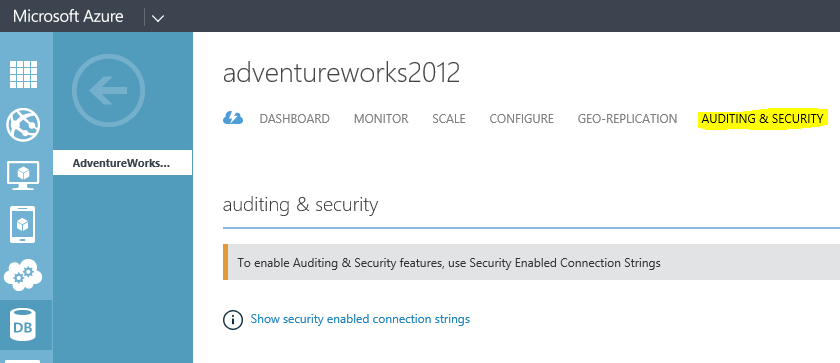
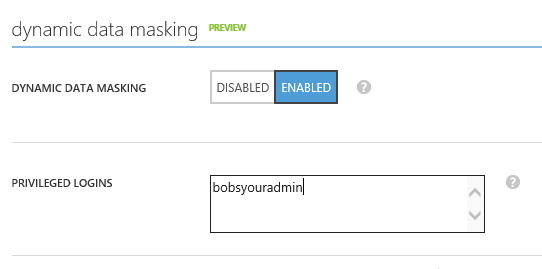
Then scroll down to the bottom and switch on Dynamic Data Masking as shown below. I'm going to add our current login as a privileged login too (this means it can query the data without a mask).
Now at this stage if I re-run the query above with the same credentials then I will get back exactly what I have above which is expected because I allowed my admin user to be excluded from the masking (and I'm not using a secured connection string).
Let's go ahead and create another login and grant it access to the database - we'll just make it a data reader so that it can run the SELECT query but not update anything.
Firstly create a login for the server
CREATE LOGIN untrusteddev WITH PASSWORD = 'N0tL0Lc4t5^'
GO
Then a user in the Master and AdventureWorks databases
CREATE USER untrusteddev FOR LOGIN untrusteddev WITH DEFAULT_SCHEMA = [dbo]
GO

-- Add user to the database data reader role (not needed in Master DB)
EXEC sp_addrolemember N'db_datareader', N'untrusteddev'
GO
Now let's close our connection to the Azure SQL Database and create a new one with our new login.
As we don't trust the developer we're going to give him a special connection setting to use. Instead of the standard
{servername}.database.windows.net
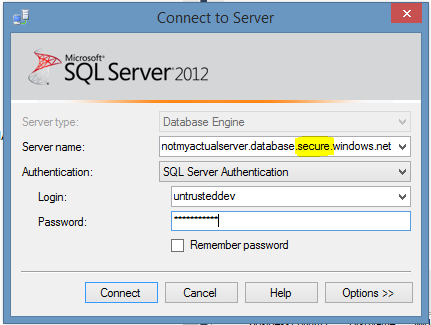
we will provide the developer with
{servername}.database.**secure**.windows.net.
We will turn off the ability for clients to connect via the old un-secured hostname as well.
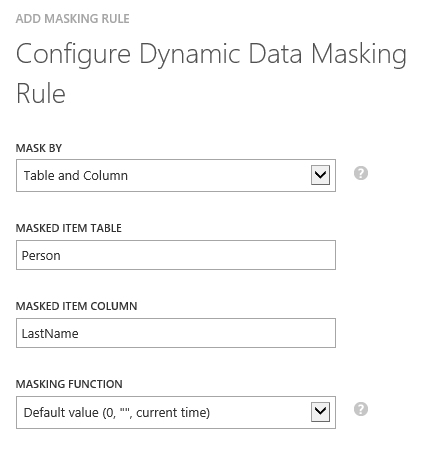
Before we give our developer access to the database let's make a tweak by adding a mask to our Person table. On the Auditing & Security page for our database I'm going to click "Add Mask" in the bottom menu and then add the mask as shown below.
Now that this is place we can provide our developer with the necessary connection details and they can connect via SSMS like so:
When the developer logs in everything looks pretty much as it always does.
Let's pop open a new Query Window in our AdventureWorks database and re-run our SQL query on the Person table from above.
SELECT TOP 10 BusinessEntityID, FirstName, MiddleName, LastName
FROM Person.Person
So can we see the full Person details as before?
and our result set looks like:
| BusinessEntityID | FirstName | MiddleName | LastName |
|---|---|---|---|
| 285 | Syed | E | XXXXXXXX |
| 293 | Catherine | R. | XXXXXXXX |
| 295 | Kim | NULL | XXXXXXXX |
| 2170 | Kim | NULL | XXXXXXXX |
| 38 | Kim | B | XXXXXXXX |
| 211 | Hazem | E | XXXXXXXX |
| 2357 | Sam | NULL | XXXXXXXX |
| 297 | Humberto | NULL | XXXXXXXX |
| 291 | Gustavo | NULL | XXXXXXXX |
| 299 | Pilar | NULL | XXXXXXXX |
The key take away from this is that we haven't actually changed the underlying data - the database does still contain the LastName of the Person - it's just that the user context of the call is such that a configured mask is applied to the data as it is retrieved from the server.
We can use this approach for a lot of different data types and I expect eventually you'll have a lot more customisation you can apply here. This is very much a "v1" release and will no doubt be added to over time. This is a great feature that may eventually remove some need to perform mass data cleansing operations when populating dev/test data sources with "production" data.