Moving from Azure VMs to Azure VM Scale Sets - VM Image Build
- Published on
- Reading time
- Authors
- Name
- Simon Waight
- Mastodon
- @simonwaight


I have previously blogged about using Visual Studio Team Services (VSTS) to securely build and deploy solutions to Virtual Machines running in Azure.
In this, and following posts I am going to take the existing build process I have and modify it so I can make use of VM Scale Sets to host my API solution. This switch is to allow the API to scale under load.
My current setup is very much fit for purpose for the limited trial it's been used in, but I know (at minimum) I'll see at least 150 times the traffic when I am running at full-scale in production, and while my trial environment barely scratches the surface in terms of consumed resources, I don't want to have to capacity plan to the n-nth degree for production.
Shifting to VM Scale Sets with autoscale enabled will help me greatly in this respect!
Current State of Affairs
Let's refresh ourselves with what is already in place.
Build
My existing build is fairly straightforward - we version the code (using a PowerShell script), restore packages, build the solution and then finally make sure all our artifacts are available for use by the Release Management process.

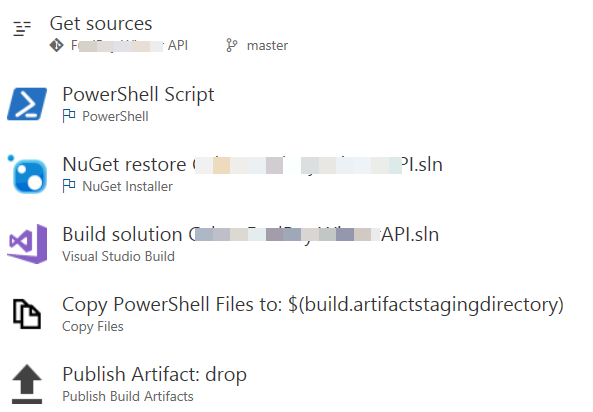
The output of this build is a Web Deploy package along with a PowerShell DSC module that configures the deployment on the target VM.
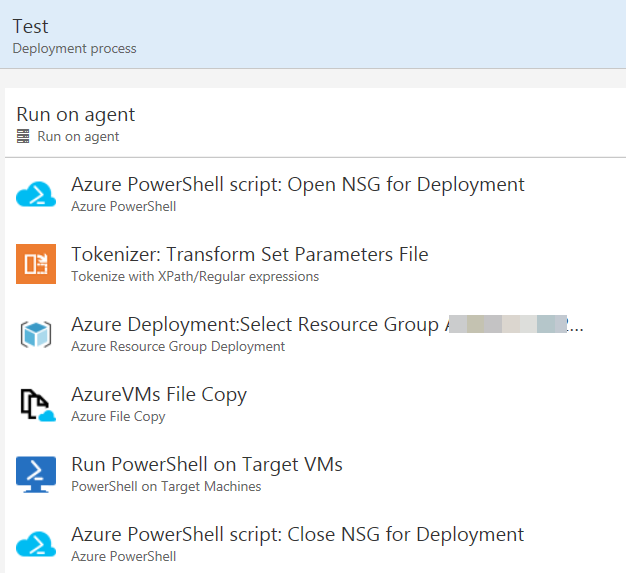
Release Management
I am using multiple Environments for Release Management to manage transformations of the Web Deploy Parameters file along with the Azure Subscription / Resource Group being deployed to. The Tasks in each Environment are the same though.
My Release Management Tasks (as shown below) open the NSG to allow DSC remote connections from VSTS, transform the Web Deploy Parameters file, find the VMs in a particular Azure Resource Group, copy the deployment package to each VM, run the DSC script to install the solution, before finally closing the NSG again to stop the unwashed masses from prying into my environment.

All good so far?
What's the goal?
The goal is to make the minimum amount of changes to existing VSTS and deployment artifacts while moving to VM Scale Sets... sounds like an interesting challenge, so let's go!
Converting the Build
The good news is that we can retain the majority of our existing Build definition.
Here are the items we do need to update.
Provisioning PowerShell
The old deployment approach leveraged PowerShell Desired State Configuration (DSC) to configure the target VM and deploy the custom code. The DSC script to achieve this is shown below.
https://gist.github.com/sjwaight/0e405d99256692ff4ac9e7cb48a24a3e
The challenge with the above PowerShell is it assumes the target VM has been configured to allow WinRM / DSC to run. In our updated approach of creating a VM Image this presents some challenges, so I redeveloped the above script so it doesn't require the use of DSC. The result is shown below.
https://gist.github.com/sjwaight/c59167101b8f7542856f70affc108d13
As an aside, we could also drop the use of the Parameters file here too. As we'll see in another post, we need to make the VM Image stateless, so any local web.config changes that are environment-specific are problematic and are best excluded from the resulting image.
Network Security Group Script
In the new model, which prepares a VM Image, we no longer need the Azure PowerShell script that opens / closes the Network Security Group (NSG) on deployment, so it's removed in the new process.
No more use of Release Management
As the result of our Build is a VM Image we no longer need to leverage Release Management either, making our overall process much simpler.
The New Build
The new Build definition shown below - you will notice the above changes have been applied, with the addition of two new Tasks. The aspect of this I am most happy about is that our core build actually remains mostly unchanged - we have had to add two additional Tasks and change one PowerShell script to make this work.


Let's look at the new Tasks.
Build Machine Image
This Task utilises Packer from Hashicorp to prepare a generalised Windows VM image that we can use in a VM Scale Set.
The key items to note are: you need an Azure Subscription where a temporary VM, and the final generalised VHD can be created so that Packer can build the baseline image for you.

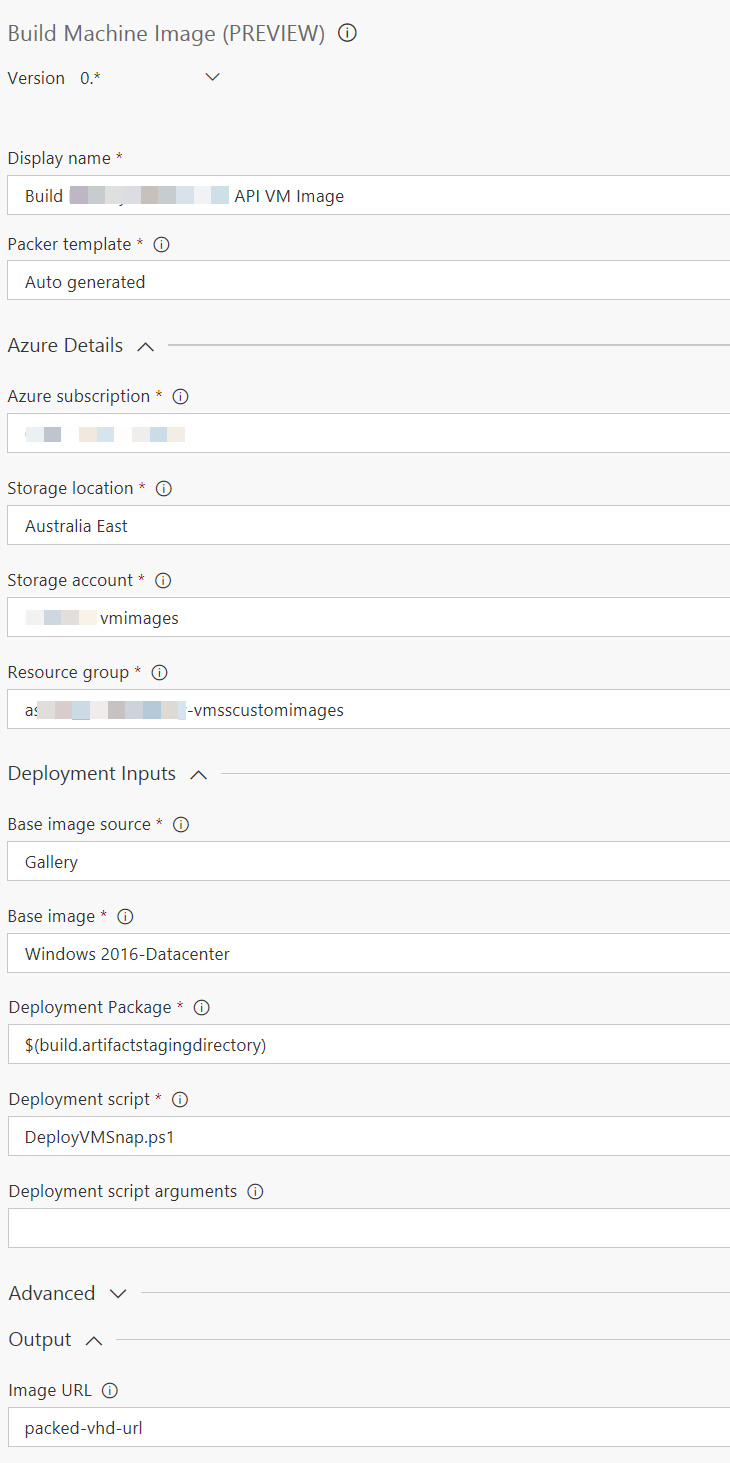
You will notice we are using the existing artifacts staging directory as the source of our configuration PowerShell (DeployVmSnap.ps1) which is used by Packer to configure up the host once the VM is created using an Azure Gallery Image.
The other important item here is the use of the output field. This will contain the fully qualified URL in blob storage where the resulting packed image will reside. We can use this in our next step.
Create VM Image Registration
The last Task I've added is to invoke an Azure PowerShell script, which is just a PowerShell script, but with the necessary environmental configuration to allow me to execute Cmdlets that interact with Azure's APIs.
The result of the previous Packer-based Task is a VHD sitting in a Blob Storage account. While we can use this in various scenarios, I am interested in ensuring it is visible in the Azure Portal and also in allowing it to be used in VM Scale Sets that utilised Managed Disks.
The PowerShell script is shown below.
https://gist.github.com/sjwaight/af30918747feca08839831c47a05f454
.. and here is how it is used in the Task in VSTS..

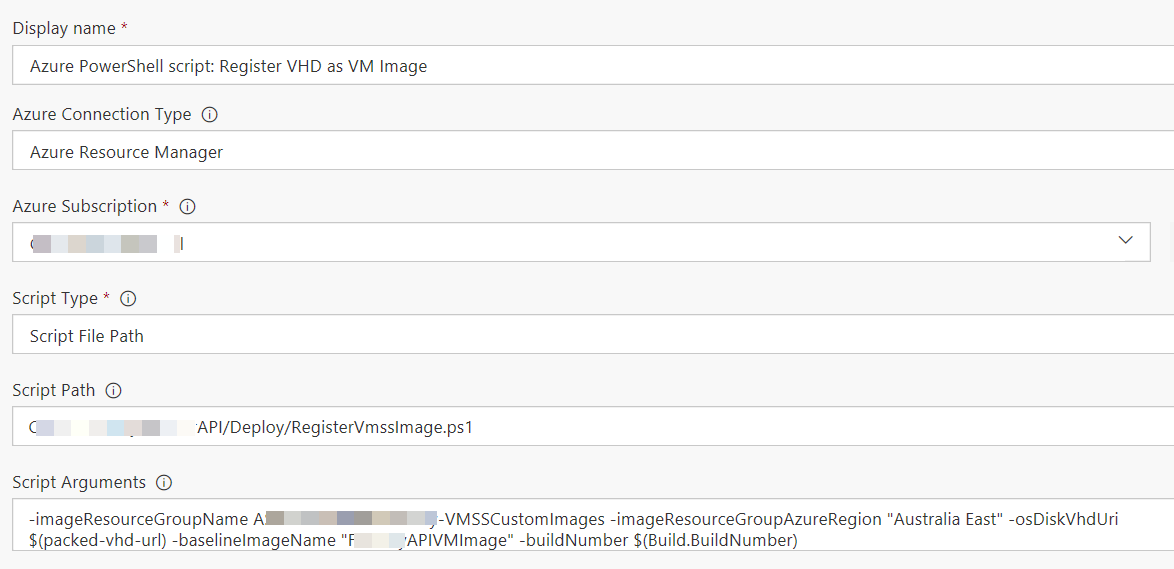
You can see how we have utilised the Packer Task's output parameter as an input into this Task (it's in the "Script Arguments" box at the bottom of the Task).
The Result
Once we have this configured and running the result is a nice crisp VM Image that can be used in a VM Scale Set. The below screenshot shows you how this looks in my environment - I wrapped the Azure Storage Account where the VHDs live, along with the VM Image registrations in the same Resource Group for cleaner management.


There are still some outstanding items we need to do with, specifically: configuration management (our VM Image has to be stateless) and VM Scale Set creation using the Image. We will deal with these two items in the following posts.
For now I hope you have a good grasp on how you can convert an existing VSTS build that deploys to existing VMs to one that produces a generalised VM Image that you can use either for new VMs or in VM Scale Sets.
Until the next post.
:)
Want to see how I dealt with instance configuration? Then have a read of my next post in this series.