Windows Containers and .NET Framework applications: DevOps with Kubernetes
- Published on
- Reading time
- Authors

- Name
- Simon Waight
- Mastodon
- @simonwaight
In my previous two posts on .NET Framework applications and Windows Containers I took a look at the rationale and approach for bringing these applications to containers before using a sample application (MVC Music Store) to show what is involved with containerising an application.
In this post I am going to take the next step - take our containerised ASP.NET web application and deploy it to Kubernetes whilst making sure the build and deployment process is centralised and repeatable.
Setting up Kubernetes
I'm going to use Azure Kubernetes Service (AKS) for this post, so to start I am going to create a new AKS cluster with a Windows Node Pool. Even though I've selected an Azure managed service there is nothing stopping you from using a similar approach to deploying to Kubernetes either on your own infrastructure or in another cloud.
Let's start by creating a new AKS cluster using the following commands.
You will be prompted for a strong Windows password for the specified admin user. If you receive an error with "Invalid adminPassword" then you haven't met the security standards set via policy and will need to increase complexity or length of the Windows admin user's password.
# Only required if AKS creation fails due to
# Service Principal not existing or unable to be created automatically.
az ad sp create-for-rbac \
    --skip-assignment \
    --name myAksServicePrincipal

# Create new cluster with 2 system (Linux)
# nodes (you will be prompted for a password)
az aks create \
    --resource-group myResourceGroup \
    --name myAKSCluster \
    --node-count 2 \
    --enable-addons monitoring \
    --generate-ssh-keys \
    --location myAzureRegion \
    --windows-admin-username windowsAdminUser \
    --vm-set-type VirtualMachineScaleSets \
    --network-plugin azure \
    --service-principal myAppIdFromAdCreate \
    --client-secret myAppPasswordFromAdCreate

# Add Windows Node Pool with 2 nodes
az aks nodepool add \
    --resource-group myResourceGroup \
    --cluster-name myAKSCluster \
    --os-type Windows \
    --name winnp \
    --node-count 2
At this point we now have a 4 node Kubernetes cluster - two nodes running Linux and two nodes running Windows.
As a final piece let's export the kubeconfig that we will use later for depoying our solution's Container to AKS from GitHub Actions.
az aks get-credentials \
    --resource-group myResourceGroup \
    --name myAKSCluster \
    --admin \
    --file akscreds.txt
The local file "akscreds.txt" now contains the data you'll need to configure a deployment into AKS. Protect this data as it is the keys to your Kubernetes castle (hint: once you've used it later to configure the deployment you should delete the file).
Configuring our connection string
In the previous post we used the new Microsoft.Configuration.ConfigurationBuilders.Environment extensions available for .NET 4.7.1+ to allow us to supply the database connection for our sample ASP.NET web application via Windows environment variables.
In Kubernetes we can supply these environment variables via a few methods to container instances. As we are dealing with sensitive information we'll use Kubernetes Secrets which are managed centrally within any cluster. Let's go ahead and add our MusicStoreEntities environment variable to our cluster.
Secret values must be supplied as base64 encoded strings. This means we have to encode our connection string before we create a Secret with it. On Windows we can do this use the following PowerShell snippet.
[Convert]::ToBase64String([System.Text.Encoding]::UTF8.GetBytes("YOUR_CONNECTION_STRING"))
This will output the connection string as a base64 encoded value. Copy the value as we will use it the next step.
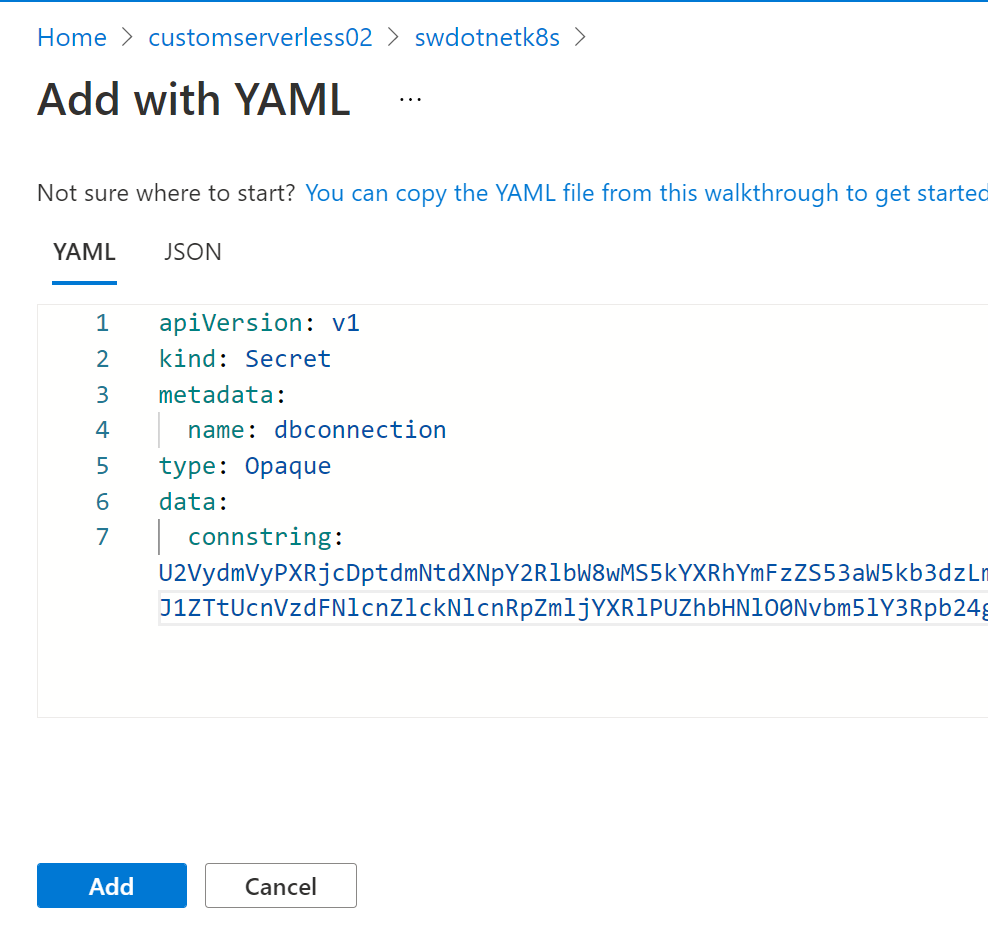
Next, use your favourite text editor (VS Code, right 😉) to create a new file called "musicstoreentities-secret.yml" that will look similar to the below. Replace the "connstring" entry with the base64 encoded connection string you just created, then save the file.
apiVersion: v1
kind: Secret
metadata:
  name: dbconnection
type: Opaque
data:
  connstring: U2Vy_NOT_A_VALID_BASE_64_sdoinsdcoin=
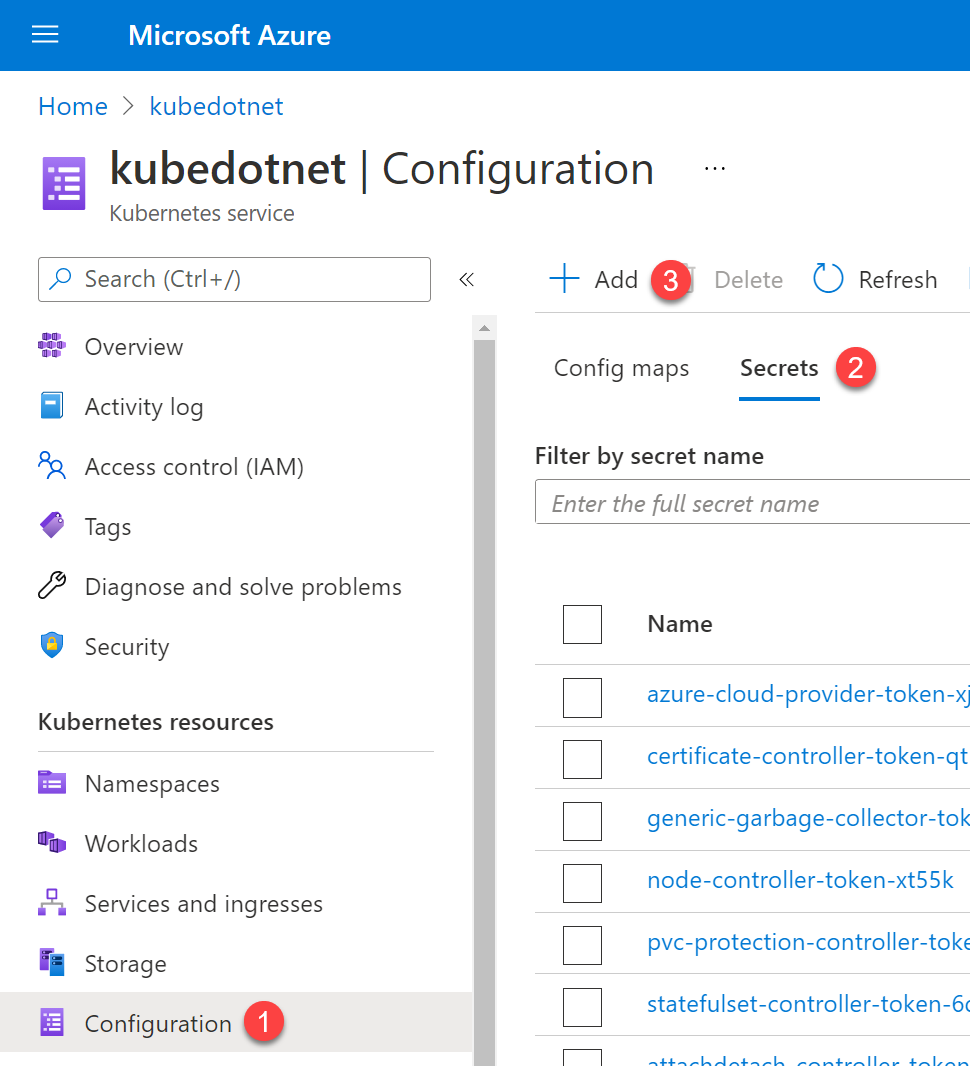
Now we have this file we can go ahead and create the secret in our cluster. Exactly how you do this will depend on how (or where) your Kubernetes setup is hosted. You can use the Kubernetes command line tool (kubectl) to add the secret, but that requires setup first which I won't cover here.
In my instance I'm using features in AKS that allow me to add the secret via the Azure Portal so I don't need to have kubectl installed or configured (I could also do it via Azure Cloud Shell *with* kubectl... but that's another story 😉).
OK, so we should now have everything we need in our Kubernetes setup so we can deploy and run our application!
Back to the Dock(er)yard
Let's return to our updated Visual Studio Solution and review the Dockerfile that was added by the Visual Studio Container tools.
#Depending on the operating system of the host machines(s) that will build or run the containers, the image specified in the FROM statement may need to be changed.
#For more information, please see https://aka.ms/containercompat

FROM mcr.microsoft.com/dotnet/framework/aspnet:4.8-windowsservercore-ltsc2019
ARG source
WORKDIR /inetpub/wwwroot
COPY ${source:-obj/Docker/publish} .
This is a very succinct Dockerfile 😎. There is no definition in this file that tells the executing builder how to actually perform steps like NuGet restore or execute MSBuild - these are all defined outside of this context because the assumption is that Visual Studio will run and that the resulting build output lives in "obj\Docker\publish".
The problem we have is that it works very well when you are building using Visual Studio, but not when you try to use this in a Continuous Integration scenario where Visual Studio may not be installed on the build host (this is a good thing BTW - not having VS on your build host).
We can fix this, but it requires some manual work as we cannot get Visual Studio to generate a full file for us. The resulting Docker file is shown below and also sits in the sample GitHub repository.
FROM mcr.microsoft.com/dotnet/framework/sdk:4.8 AS build
WORKDIR /app
# copy csproj and restore as distinct layers
COPY MvcMusicStore-Completed/*.sln .
COPY MvcMusicStore-Completed/MvcMusicStore/*.csproj ./MvcMusicStore/
COPY MvcMusicStore-Completed/MvcMusicStore/*.config ./MvcMusicStore/
RUN nuget restore
# copy everything else and build app
COPY MvcMusicStore-Completed/MvcMusicStore/. ./MvcMusicStore/
WORKDIR /app/MvcMusicStore
RUN msbuild /p:Configuration=Release -r:False
FROM mcr.microsoft.com/dotnet/framework/aspnet:4.8 AS runtime
WORKDIR /inetpub/wwwroot
COPY /app/MvcMusicStore/. ./
The above Dockerfile is a multi-stage Docker file and it's worth exploring it a bit. Our initial build and compilation takes place on the sdk:48 base image (tagged as "build"). This image contains the full .NET Framework SDK which includes tooling such as MS Build.
Once the application has been succcessfully compiled we then use a new base image (aspnet:4.8 - tagged as "runtime") to which our build output is copied. This new base image does not contain the full SDK. Both from an image size and security standpoint this is a win - we don't have unnecessary files on our runtime host which is great.
Storing our Container Images
Once built we need a location to store our Container Images. In most cases these Images are held in private Container Registries, and for this post I am going to use Azure Container Registry (ACR) as my storage location. You can choose to use any Docker-compatible Registry you like though as long as GitHub Actions can publish to it.
az acr create --name myContainerRegistry \
              --resource-group myResourceGroup \
              --sku Basic \
              --admin-enabled true \
              --location myAzureRegion
Once the Container Registry is provisioned I then need to attach it to my AKS cluster. This will enable AKS to pull images from the ACR instance without the need for pull secrets.
az aks update \
   --resource-group myResourceGroup \
   --name myAKSCluster \
   --attach-acr $(az acr show --name myContainerRegistry --resource-group myResourceGroup --query "id" -o tsv)
Building our Container Image with GitHub Actions
Thankfully the task of building and pushing our Container is not that difficult, particularly if we select 'windows-latest' as our build host in GitHub Actions. Windows Server 2019 ('windows-latest at time of writing) contains all the necessary Docker binaries we need to build a Windows Container, so we don't need to spend time specialising the host which is great.
The below code block contains the contents of the GitHub Action that does exactly what we need. You can find the actual definition in the 'deploy-to-k8s' branch of the repository on GitHub.
name: Build Windows Container Image

on:
  push:
    branches: [ post-containerisation ]
  pull_request:
    branches: [ post-containerisation ]
  workflow_dispatch:

env:
  dockerfilePath: 'MvcMusicStore-Completed\CIDockerfile'
  USER: ${{ secrets.ACR_USER }}
  TOKEN: ${{ secrets.ACR_SECRET }}
  REPOSITORY: ${{ secrets.ACR_INSTANCE }}

# A workflow run is made up of one or more jobs that can run sequentially or in parallel
jobs:
  # This workflow contains a single job called "build"
  build-and-deploy-to-azure:
    # The type of runner that the job will run on
    runs-on: windows-latest

    # Steps represent a sequence of tasks that will be executed as part of the job
    steps:
      # Checks-out your repository under $GITHUB_WORKSPACE, so your job can access it
      - uses: actions/checkout@v2

      - name: Build and push an image to container registry
        run: |
          docker login $env:REPOSITORY -u $env:USER -p $env:TOKEN
          docker build --file=$env:dockerfilePath -t ${{ secrets.ACR_INSTANCE }}/${{ secrets.IMAGE_NAME }}:${{ github.run_id }} .
          docker image push ${{ secrets.ACR_INSTANCE }}/${{ secrets.IMAGE_NAME }}:${{ github.run_id }}
          docker logout
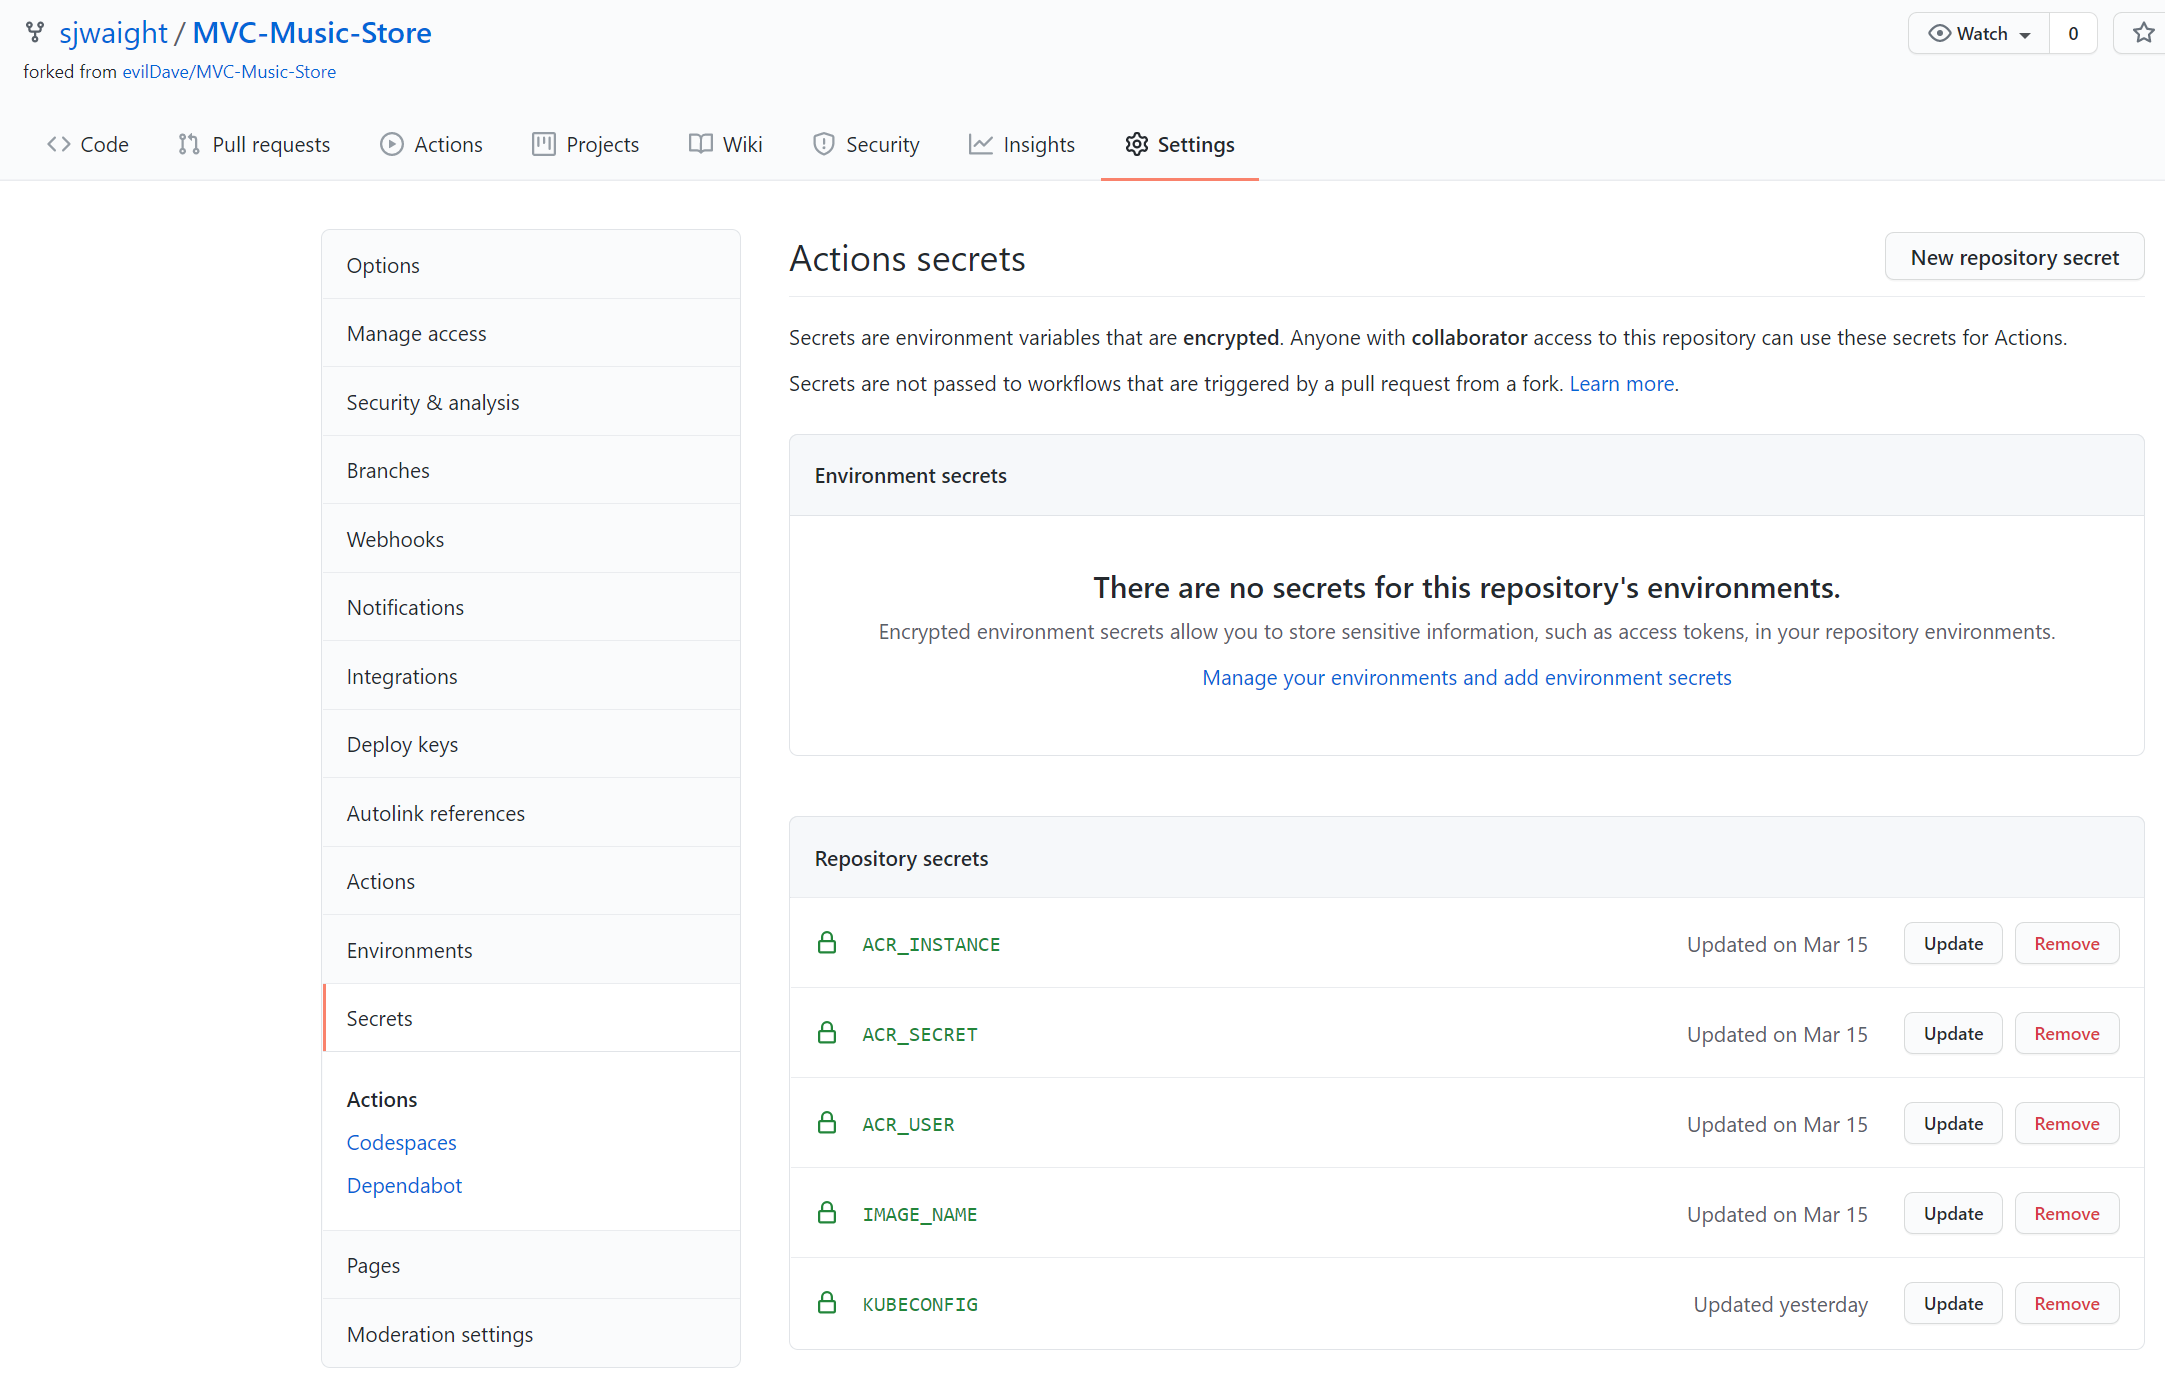
In order to get this Action functional we need to define a few GitHub Actions Secrets which are only made available to the build agent when the Action executes. Secrets are a great way to hide information from others not authorised to access upstream services (such as our Container Registry) or from those who may troubleshoot failures looking at logs (Secrets are not captured in logs).
Our Secrets are as follows:
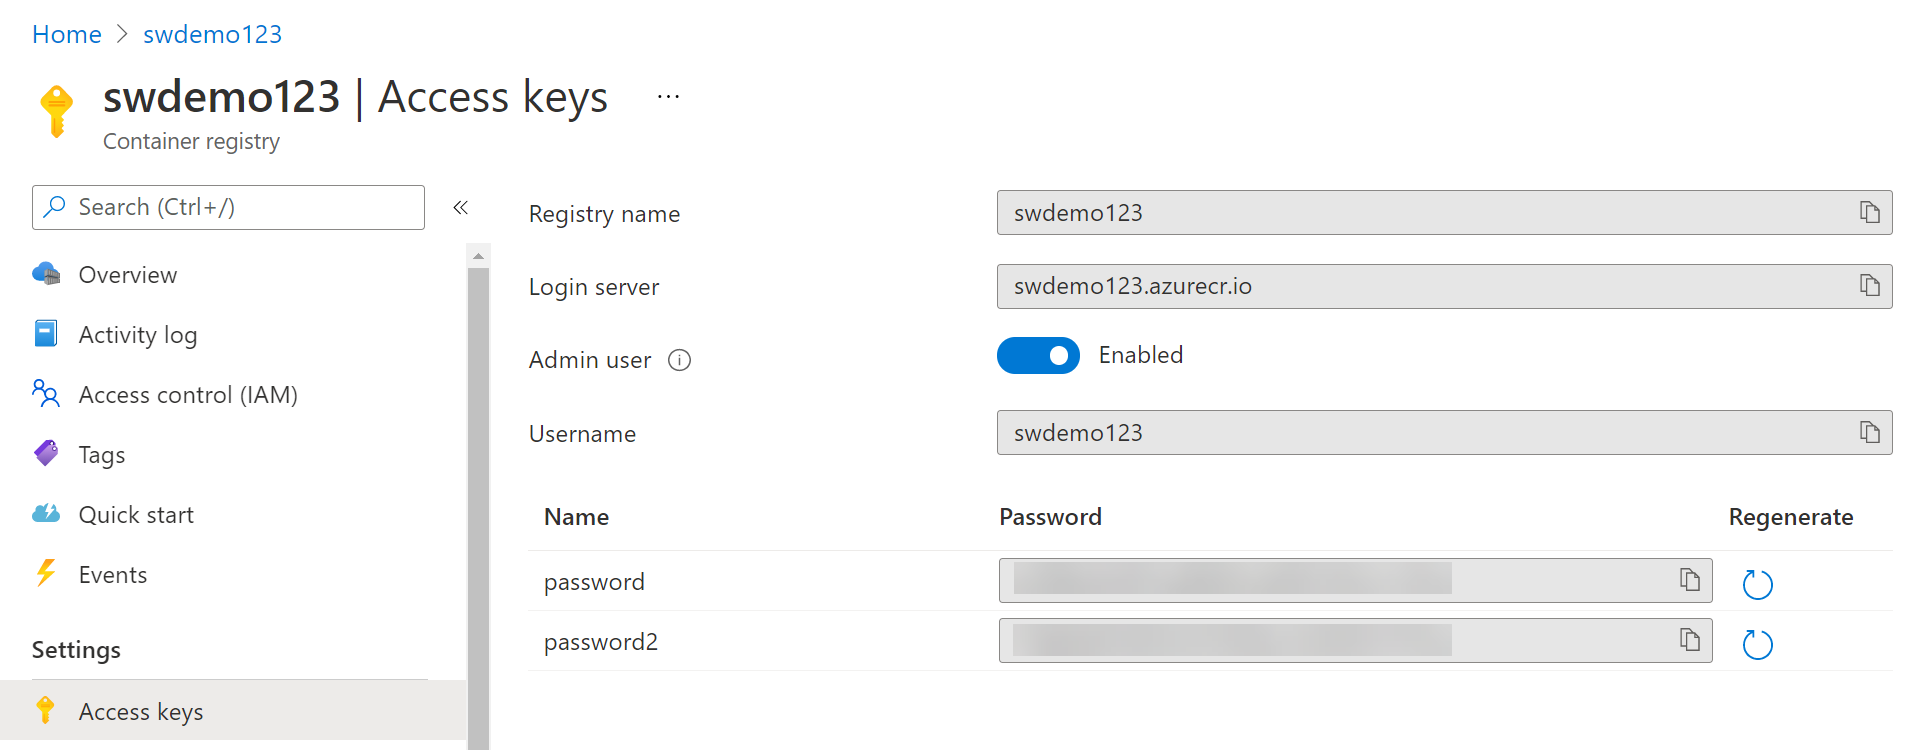
- ACR_USER: Azure Container Registry user (Username on Access Keys blade in Azure Portal - typically same as Registry name).
- ACR_INSTANCE: Azure Container Registry name.
- ACR_SECRET: Azure Container Registry Password or Password2 value.
- IMAGE_NAME: Used as the Docker image name. Doesn't necessarily have to be a secret, but might be useful to obfuscate the image name. This also ends up as the 'repository name' in Azure Container Registry.
- KUBECONFIG: grab the contents of the 'akscreds.txt' file and paste it into this. We'll use this later to deploy to Kubernetes.
Once you have copied the details from Azure Container Registry and the Azure Kubernetes Service, add them to your GitHub Repository as Secrets.
Deploying to Kubernetes
The last piece of the puzzle is taking our freshly minted Container Image and deploying it to Kubernetes. We have a couple of ways to do this - either by defining some YAML and deploying the Image using kubectl, or we can look at using Helm. For this post I am going to use Helm. You'll need to install the Windows release of Helm first before you can work with it on your local developer machine.
Once Helm is installed, open the MVC Music Store project in Windows Explorer and in the root folder create a new sub-folder called 'charts'. Open this folder at a command-line and issue the following command to create a Helm Chart scaffold.
helm create mvcmusicstoreweb
A series of files and folders will be created and we only need to make a few minor changes to the scaffolded files to be able to use them.
Edit the Chart.yaml file and update it as follows. We should auto-update some values in this file and the values.yaml file, but for the purpose of this blog post we'll go with static values. Key items of note below are the name, description and appVersion attributes.
apiVersion: v2
name: mvcmusicstoreweb
description: MVC Music Store web application

# A chart can be either an 'application' or a 'library' chart.
#
# Application charts are a collection of templates that can be packaged into versioned archives
# to be deployed.
#
# Library charts provide useful utilities or functions for the chart developer. They're included as
# a dependency of application charts to inject those utilities and functions into the rendering
# pipeline. Library charts do not define any templates and therefore cannot be deployed.
type: application

# This is the chart version. This version number should be incremented each time you make changes
# to the chart and its templates, including the app version.
# Versions are expected to follow Semantic Versioning (https://semver.org/)
version: 0.1.0

# This is the version number of the application being deployed. This version number should be
# incremented each time you make changes to the application. Versions are not expected to
# follow Semantic Versioning. They should reflect the version the application is using.
# It is recommended to use it with quotes.
appVersion: "latest"
Then we need to make some modifications the the values.yaml file as well. Key entries to update or add here include the nameOverride, fullnameOverride, requests (cpu and memory) and the nodeSelector to ensure the workload is scheduled onto a Windows Container host.
# Default values for mvcmusicstoreweb.
# This is a YAML-formatted file.
# Declare variables to be passed into your templates.

replicaCount: 1

image:
  repository: your_repo.azurecr.io/mvcmusicstoreweb
  pullPolicy: Always
  # Overrides the image tag whose default is the chart appVersion.
  tag: ""

imagePullSecrets: []
nameOverride: "mvcmusicstore"
fullnameOverride: "mvcmusicstore"

serviceAccount:
  # Specifies whether a service account should be created
  create: true
  # Annotations to add to the service account
  annotations: {}
  # The name of the service account to use.
  # If not set and create is true, a name is generated using the fullname template
  name: ""

podAnnotations: {}

podSecurityContext: {}
  # fsGroup: 2000

securityContext: {}
  # capabilities:
  #   drop:
  #   - ALL
  # readOnlyRootFilesystem: true
  # runAsNonRoot: true
  # runAsUser: 1000

service:
  type: LoadBalancer
  port: 80

ingress:
  enabled: false
  annotations: {}
    # kubernetes.io/ingress.class: nginx
    # kubernetes.io/tls-acme: "true"
  hosts:
    - host: chart-example.local
      paths:
      - path: /
        backend:
          serviceName: chart-example.local
          servicePort: 80
  tls: []
  #  - secretName: chart-example-tls
  #    hosts:
  #      - chart-example.local

resources:
  requests:
    cpu: 512m
    memory: 256Mi

autoscaling:
  enabled: false
  minReplicas: 1
  maxReplicas: 10

nodeSelector:
  kubernetes.io/os: windows

tolerations: []

affinity: {}
The final piece of the puzzle is to make sure that our environment variable containing our database connection string (MusicStoreEntities) is populated from a Kubernetes Secret.
In order to make this happen we need to edit the templates\deployment.yaml Helm file and add the env section below that tells Kubernetes to create an environment variable and pull the value from a named Secret (dbconnection) which we created earlier in this post.
apiVersion: apps/v1
kind: Deployment
metadata:
  name: {{ include "mvcmusicstoreweb.fullname" . }}
  labels:
    {{- include "mvcmusicstoreweb.labels" . | nindent 4 }}
spec:
  {{- if not .Values.autoscaling.enabled }}
  replicas: {{ .Values.replicaCount }}
  {{- end }}
  selector:
    matchLabels:
      {{- include "mvcmusicstoreweb.selectorLabels" . | nindent 6 }}
  template:
    metadata:
      {{- with .Values.podAnnotations }}
      annotations:
        {{- toYaml . | nindent 8 }}
      {{- end }}
      labels:
        {{- include "mvcmusicstoreweb.selectorLabels" . | nindent 8 }}
    spec:
      {{- with .Values.imagePullSecrets }}
      imagePullSecrets:
        {{- toYaml . | nindent 8 }}
      {{- end }}
      serviceAccountName: {{ include "mvcmusicstoreweb.serviceAccountName" . }}
      securityContext:
        {{- toYaml .Values.podSecurityContext | nindent 8 }}
      containers:
        - name: {{ .Chart.Name }}
          securityContext:
            {{- toYaml .Values.securityContext | nindent 12 }}
          image: "{{ .Values.image.repository }}:{{ .Values.image.tag | default .Chart.AppVersion }}"
          imagePullPolicy: {{ .Values.image.pullPolicy }}
          env:
            - name: MusicStoreEntities
              valueFrom:
                secretKeyRef:
                  key: connstring
                  name: dbconnection
          ports:
            - name: http
              containerPort: 80
              protocol: TCP
          livenessProbe:
            httpGet:
              path: /
              port: http
          readinessProbe:
            httpGet:
              path: /
              port: http
          resources:
            {{- toYaml .Values.resources | nindent 12 }}
      {{- with .Values.nodeSelector }}
      nodeSelector:
        {{- toYaml . | nindent 8 }}
      {{- end }}
      {{- with .Values.affinity }}
      affinity:
        {{- toYaml . | nindent 8 }}
      {{- end }}
      {{- with .Values.tolerations }}
      tolerations:
        {{- toYaml . | nindent 8 }}
      {{- end }}
We also need to build and deploy the Helm Chart somewhere. For my purposes I am going to use Azure Container Registry's inbuilt Helm Chart support for storing built Charts and then add a stage to my GitHub Action that builds the Chart for me.
You can find the 'build-and-push-helm-chart step in the Action on GitHub which is reproduced in full below. Note that we don't need to install Helm on the build host as the Windows 2019 hosts used by GitHub Actions already have it deployed.
name: Build Windows Container Image

on:
  push:
    branches: [ deploy-to-k8s ]
  pull_request:
    branches: [ deploy-to-k8s ]
  workflow_dispatch:

env:
  dockerfilePath: 'MvcMusicStore-Completed\CIDockerfile'
  USER: ${{ secrets.ACR_USER }}
  TOKEN: ${{ secrets.ACR_SECRET }}
  REPOSITORY: ${{ secrets.ACR_INSTANCE }}

# A workflow run is made up of one or more jobs that can run sequentially or in parallel
jobs:
  # This workflow contains a single job called "build"
  build-and-publish-docker-image:
    name: Build and Publish Docker Image
    runs-on: windows-latest
    steps:
      - uses: actions/checkout@v2

      - name: Build and push an image to container registry
        run: |
          docker login $env:REPOSITORY -u $env:USER -p $env:TOKEN
          docker build --file=$env:dockerfilePath -t ${{ secrets.ACR_INSTANCE }}/${{ secrets.IMAGE_NAME }}:${{ github.run_id }} -t ${{ secrets.ACR_INSTANCE }}/${{ secrets.IMAGE_NAME }}:latest .
          docker image push --all-tags ${{ secrets.ACR_INSTANCE }}/${{ secrets.IMAGE_NAME }}
          docker logout
  build-and-push-helm-chart:
    name: Build and Push Helm Chart
    runs-on: windows-latest
    needs: [build-and-publish-docker-image]
    steps:
    - uses: actions/checkout@master

    - name: Helm Repo Add
      run: |
        helm repo add ${{ secrets.ACR_INSTANCE }} https://${{ secrets.ACR_INSTANCE }}/helm/v1/repo --username ${{ secrets.ACR_USER }} --password ${{ secrets.ACR_SECRET }}
      env:
        HELM_EXPERIMENTAL_OCI: 1

    - name: Helm Chart Save
      run: |
        cd .\charts\mvcmusicstoreweb
        helm chart save . ${{ secrets.IMAGE_NAME }}:v${{ github.run_id }}
        helm chart save . ${{ secrets.ACR_INSTANCE }}/helm/${{ secrets.IMAGE_NAME }}:v${{ github.run_id }}
        # list out saved charts
        helm chart list
      env:
        HELM_EXPERIMENTAL_OCI: 1

    - name: Helm Chart Push
      run: |
        helm registry login ${{ secrets.ACR_INSTANCE }} --username ${{ secrets.ACR_USER }} --password ${{ secrets.ACR_SECRET }}
        helm chart push ${{ secrets.ACR_INSTANCE }}/helm/${{ secrets.IMAGE_NAME }}:v${{ github.run_id }}
      env:
        HELM_EXPERIMENTAL_OCI: 1

  aks-deployment:
    name: AKS Deployment
    runs-on: windows-latest
    needs: [build-and-publish-docker-image,build-and-push-helm-chart]
    steps:
    - uses: actions/checkout@master

    - name: kubeconfig
      run: echo "${{ secrets.KUBECONFIG }}" >> kubeconfig

    - name: Helm Repo Add
      run: |
        helm repo add ${{ secrets.ACR_INSTANCE }} https://${{ secrets.ACR_INSTANCE }}/helm/v1/repo --username ${{ secrets.ACR_USER }} --password ${{ secrets.ACR_SECRET }}
        helm repo update
      env:
        HELM_EXPERIMENTAL_OCI: 1

    - name: Helm Upgrade
      run: |
        mkdir upgrade
        helm registry login ${{ secrets.ACR_INSTANCE }} --username ${{ secrets.ACR_USER }} --password ${{ secrets.ACR_SECRET }}
        helm chart pull ${{ secrets.ACR_INSTANCE }}/helm/${{ secrets.IMAGE_NAME }}:v${{ github.run_id }}
        helm chart export ${{ secrets.ACR_INSTANCE }}/helm/${{ secrets.IMAGE_NAME }}:v${{ github.run_id }} --destination .\upgrade
        helm upgrade ${{ secrets.IMAGE_NAME }} .\upgrade\${{ secrets.IMAGE_NAME }} -i
      env:
        KUBECONFIG: '.\kubeconfig'
        HELM_EXPERIMENTAL_OCI: 1
Now if we submit this GitHub Action we should see a new Windows Container image built, published to Azure Container Registry, followed by a new Helm Chart being created and published, also to Azure Container Registry. Finally, the Helm Chart is then used to tell Kubernetes to either deploy or update the Image running on the cluster. You can view this successful run on GitHub.
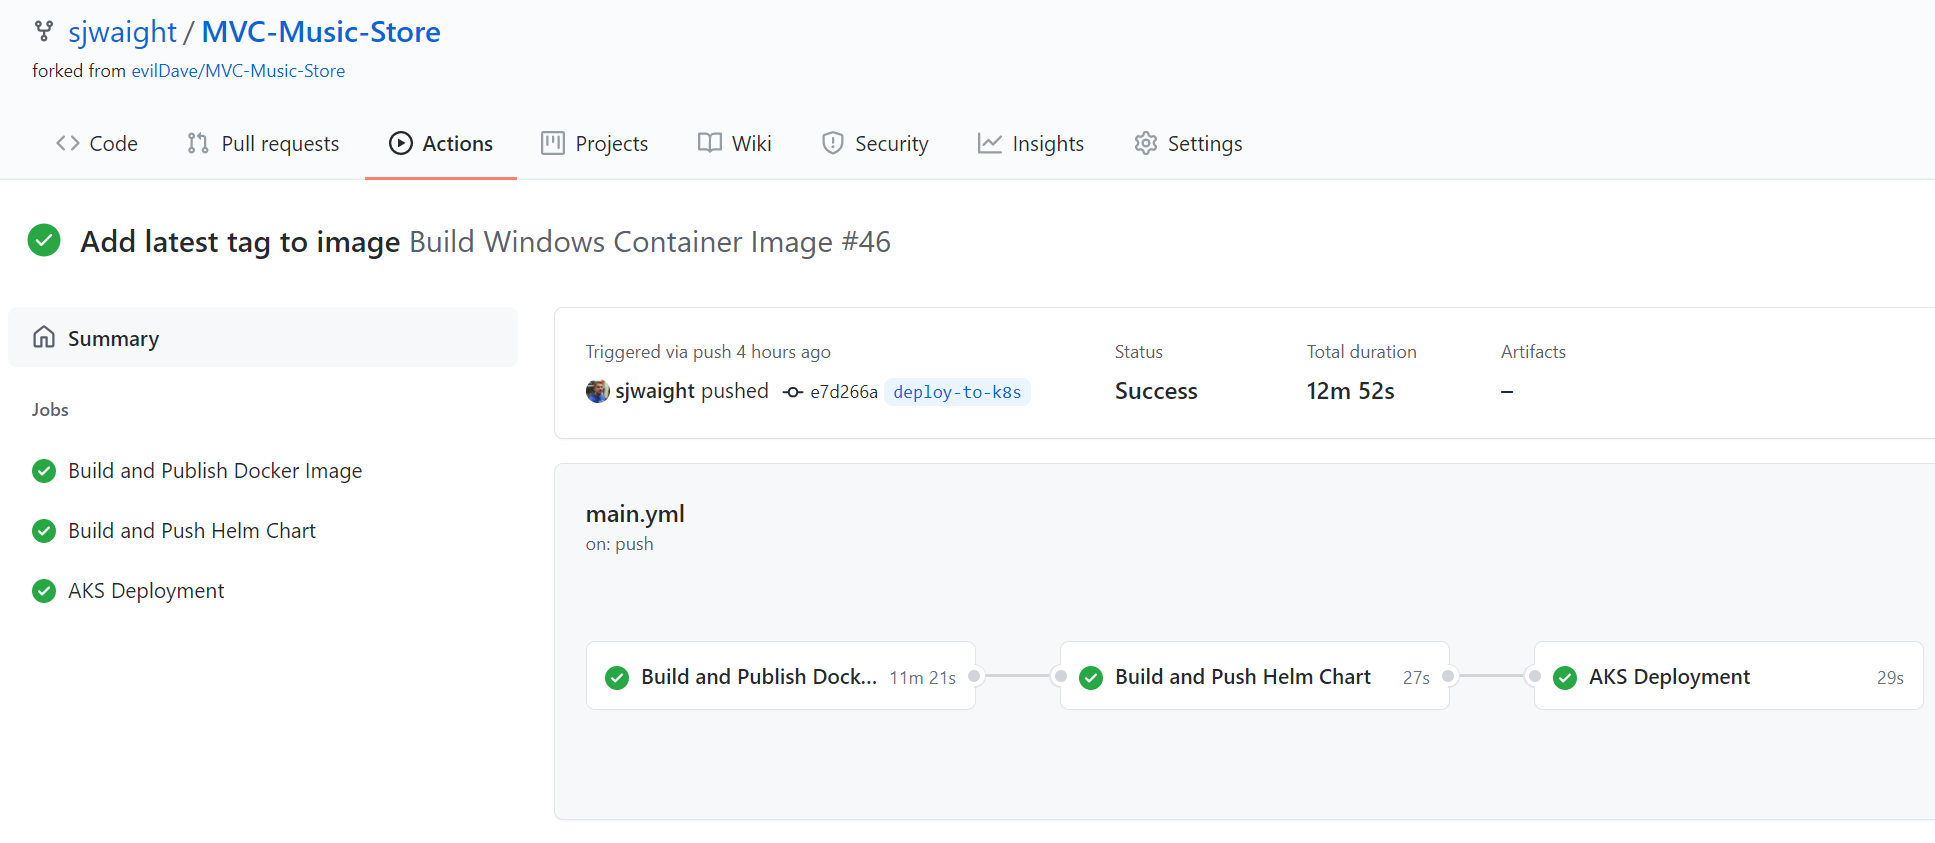
You can see the Image build takes 11 minutes. That's not a trivial amount of time, but I am using the free running tier in GitHub Actions, so it's likely you could speed this up. Having said this, you may not run this process on every check-in and may wish to use it only for PR-merges into a deployment branch (for example!)
Once these steps are completed we should find that we have a new Service in AKS called 'mvcmusicstore' and that it has a LoadBalancer type with an External IP address.
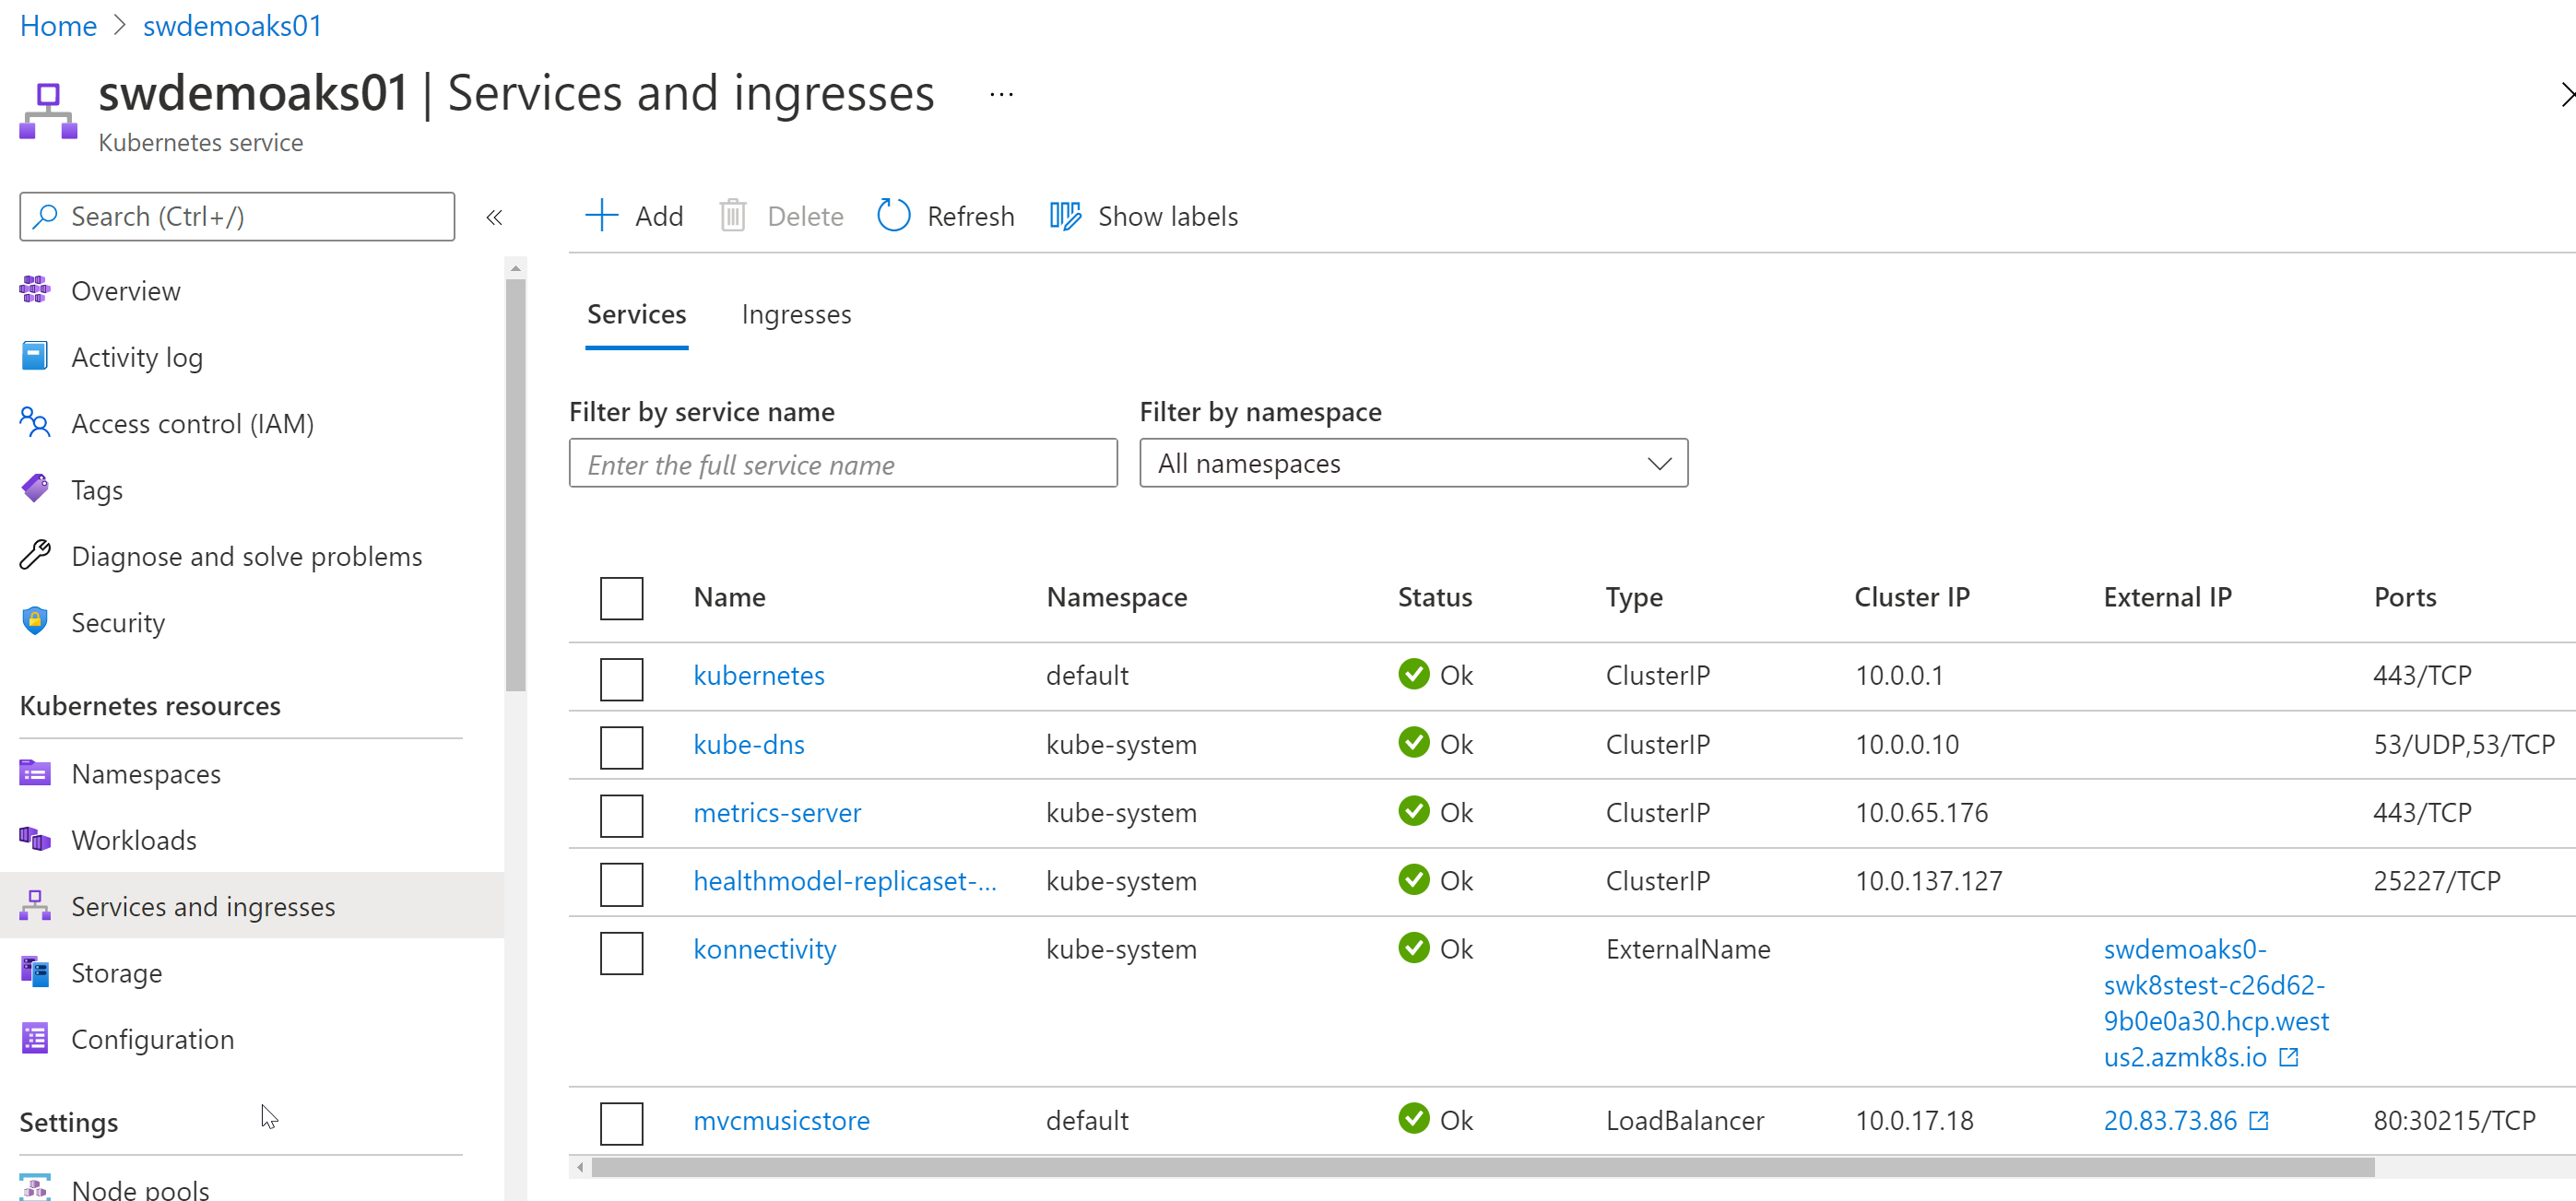
If we click on that IP address we get...
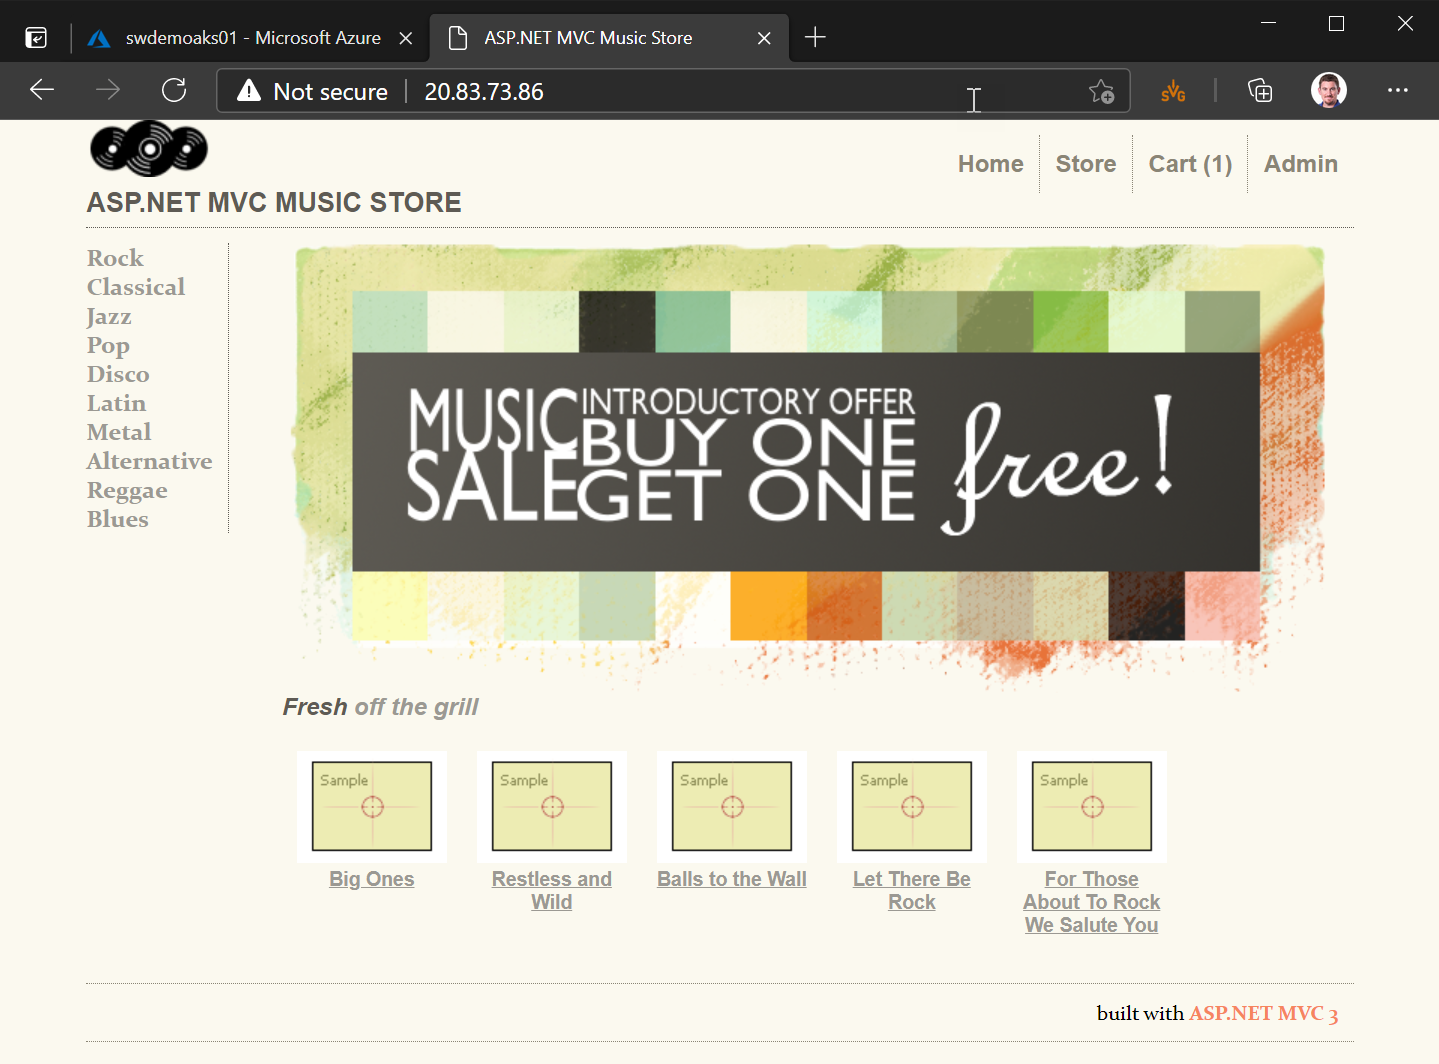
... the sweet taste of success!!
Whew! 🤓
Note: if you don't get a web page loading or you find your containers fail to start, and you chose to use Azure SQL Database, make sure to check that you have allowed Azure services through the Azure SQL Database Firewall.
So we made it through - taking an existing ASP.NET Web Application and moving it into Windows Containers and then showing how we can deploy it to Kubernetes, while ensuring it can still connect to its database.
While this has been a fairly simple application to move, a lot of concepts are the same, even for complex applications. Most work will likely go into bringing the .NET release up to a supported version (3.5+), along with making sure any third party libraries work as expected.
I hope you've learned about modernisation of .NET applications using Windows Containers in this series of posts, and until next time...
Happy Days! 😎
Featured image (on social posts) is from Jim Bahn on Flickr used under CC BY 2.0.